
Strawberry Crunch Cheesecake Cones Recipe
Introduction
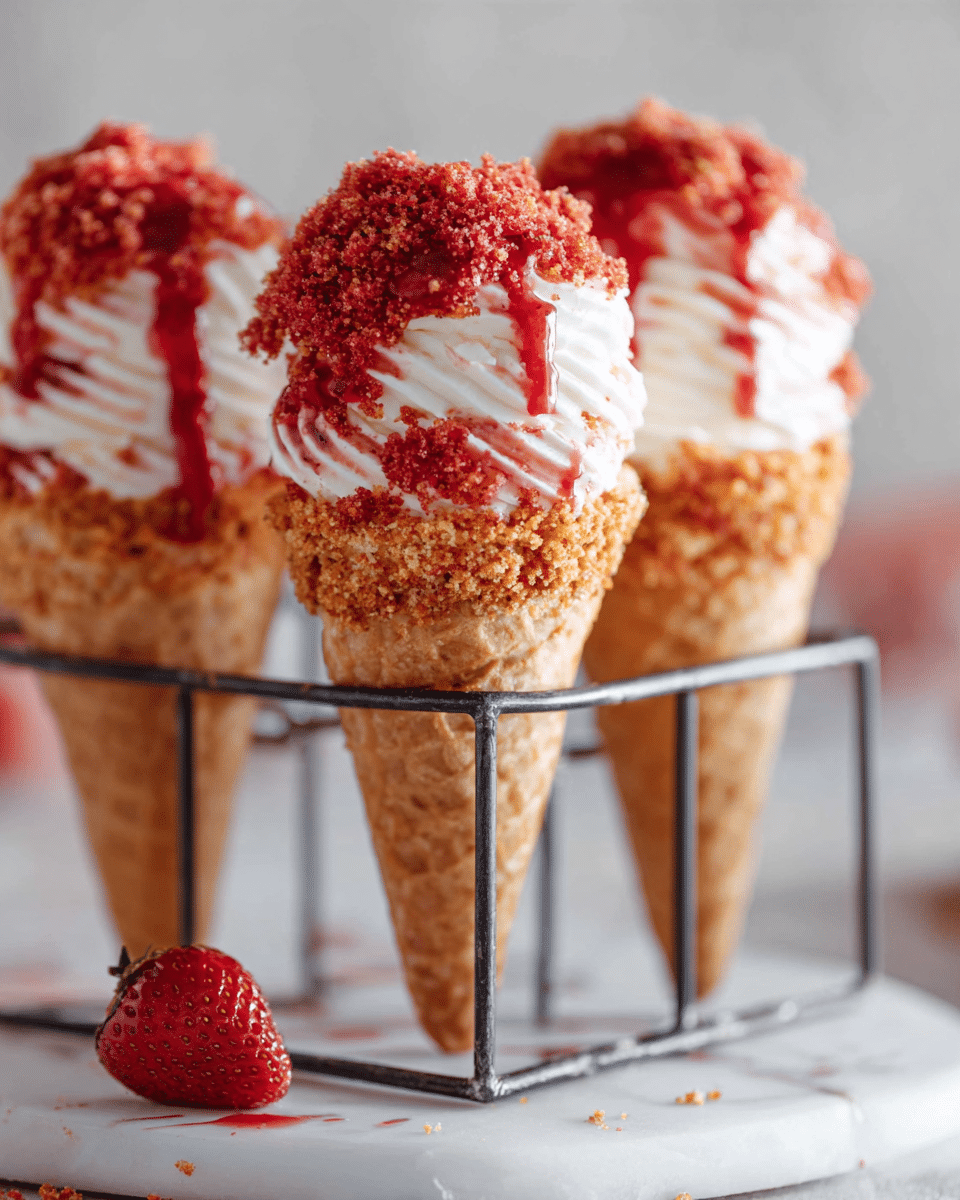
Strawberry Crunch Cheesecake Cones offer a delightful twist on classic cheesecake, combining creamy filling with fresh strawberries and a crunchy, sweet cone. These no-bake treats are perfect for warm days or anytime you want a fun and elegant dessert.
Ingredients
- 1 pint strawberries, hulled and finely diced
- ½ cup granulated sugar
- 1 tsp fresh lemon juice
- 14 Golden Oreos
- ½ oz freeze dried strawberries
- 3 tbsp unsalted butter, melted
- ⅛ tsp kosher salt
- 10 oz vanilla melting wafers (or white chocolate)
- 8 waffle cones
- 16 oz cream cheese, room temperature
- 1 cup powdered sugar, sifted
- 1 tsp vanilla extract
- 1 tsp lemon juice
- ⅛ tsp kosher salt (Diamond Crystal)
- ¼ cup sour cream
- 1¼ cups heavy whipping cream, cold
- 8 strawberries, hulled and sliced (for topping)
- ¼ cup strawberry crunch crumble (for topping the cones)
- ¼ cup strawberry compote (for topping the cones)
Instructions
- Step 1: Make the strawberry compote by combining diced strawberries, granulated sugar, and lemon juice in a medium saucepan. Heat over medium until simmering, then reduce to low and simmer for 20 minutes, stirring occasionally. Remove from heat and let cool.
- Step 2: Prepare the strawberry crunch topping by blending Golden Oreos, freeze dried strawberries, melted butter, and kosher salt in a food processor until it reaches a fine crumb texture.
- Step 3: Melt the vanilla melting wafers in a microwave-safe bowl in 30-second intervals, stirring between each until fully smooth.
- Step 4: Dip the open end of each waffle cone into the melted wafers, shake off excess, and immediately roll in the strawberry crunch crumble. Stand cones upright in a rack or on a parchment-lined sheet tray. Repeat until all cones are coated.
- Step 5: Make the no-bake cheesecake filling by beating cream cheese with a hand mixer on medium speed for 1 minute until smooth.
- Step 6: Add powdered sugar and mix on low just until combined, then increase speed and beat for 1 more minute.
- Step 7: Stir in vanilla extract, lemon juice, and kosher salt, then mix in sour cream until smooth.
- Step 8: In a separate bowl, whip cold heavy cream on medium-high speed until stiff peaks form.
- Step 9: Gently fold the whipped cream into the cream cheese mixture, maintaining a light texture.
- Step 10: Spoon or pipe a tablespoon of strawberry compote into the bottom of each prepared cone.
- Step 11: Fill each cone with the no-bake cheesecake mixture using a piping bag for a neat finish.
- Step 12: Top each cone with additional strawberry crunch crumble, a dollop of strawberry compote, and fresh sliced strawberries.
- Step 13: Serve the cones immediately and enjoy the creamy, crunchy strawberry delight!
Tips & Variations
- For extra flavor, add a splash of strawberry liqueur to the compote while cooking.
- Try using chocolate melting wafers instead of vanilla for a richer coating on the cone edges.
- Freeze dried raspberries can be used in place of strawberries for a different berry crunch.
- To make the cones vegan, substitute cream cheese and heavy cream with coconut-based alternatives and use dairy-free melting wafers.
Storage
Store assembled cheesecake cones in the refrigerator for up to 24 hours to keep them fresh. The cones may soften over time, so it’s best to enjoy them soon after assembling. If storing the cheesecake filling and toppings separately, keep them refrigerated and assemble just before serving. Reheat is not recommended for this dessert.
How to Serve

Serve this delicious recipe with your favorite sides.
FAQs
Can I prepare these cones in advance?
You can prepare the compote, crunch topping, and cheesecake filling a day ahead and store them separately in the refrigerator. Assemble the cones shortly before serving for the best texture and flavor.
What can I substitute for vanilla melting wafers?
If you don’t have vanilla melting wafers, white chocolate chips or any white chocolate will work similarly. Just melt carefully in short intervals to avoid burning.
Print
Strawberry Crunch Cheesecake Cones Recipe
- Total Time: 45 minutes
- Yield: 8 cheesecake cones 1x
- Diet: Vegetarian
Description
Delight in these Strawberry Crunch Cheesecake Cones—a no-bake, handheld dessert combining creamy vanilla cheesecake, fresh strawberries, and a crunchy strawberry-infused Oreo crust all served in crispy waffle cones. Perfect for a summer treat or party dessert, these cones offer a pleasing mix of textures and flavors.
Ingredients
Strawberry Compote
- 1 pint strawberries, hulled and fine diced
- ½ cup granulated sugar
- 1 tsp fresh squeezed lemon juice
Strawberry Crunch Cone Base
- 14 Golden Oreos
- ½ oz freeze dried strawberries
- 3 tbsp unsalted butter, melted
- ⅛ tsp kosher salt
- 8 waffle cones
- 10 oz vanilla melting wafers (or white chocolate)
- ¼ cup strawberry crunch crumble (for topping)
No-Bake Cheesecake
- 16 oz cream cheese, room temperature
- 1 cup powdered sugar, sifted
- 1 tsp vanilla extract
- 1 tsp lemon juice
- ⅛ tsp kosher salt (Diamond Crystal)
- ¼ cup sour cream
- 1¼ cup heavy whipping cream, cold
For Garnish
- 8 strawberries, hulled and sliced
- ¼ cup strawberry compote (for topping the cones)
Instructions
- Make Strawberry Compote: Combine diced strawberries, granulated sugar, and lemon juice in a medium saucepan. Heat over medium heat until it begins to simmer, then reduce to low and simmer for 20 minutes, stirring occasionally. Remove from heat, let cool, and set aside.
- Prepare Strawberry Crunch Cone Base: In a food processor, blend Golden Oreos, freeze dried strawberries, melted butter, and kosher salt until a fine crumb or slightly larger texture forms.
- Melt Coating: In a microwave-safe bowl, melt vanilla melting wafers (or white chocolate) in 30-second increments, stirring between each until fully melted.
- Coat Cone Edges: Dip the open end of each waffle cone into the melted wafers, shake off excess, then roll the dipped edge into the strawberry crunch crumble. Stand cones upright in a rack or place on parchment-lined sheet tray. Repeat for all cones.
- Make No-Bake Cheesecake Filling: Using a hand mixer or stand mixer bowl, beat cream cheese on medium speed for 1 minute until smooth. Add powdered sugar and mix on low to combine, then on high for 1 minute. Add vanilla extract, lemon juice, and kosher salt, mixing to combine. Mix in sour cream.
- Whip Heavy Cream: In a separate medium bowl, beat cold heavy cream on medium-high speed until stiff peaks form.
- Fold Cream: Gently fold whipped cream into the cream cheese mixture until fully incorporated and smooth.
- Assemble Cheesecake Cones: Spoon a tablespoon of strawberry compote into the bottom of each coated waffle cone to add moisture and flavor.
- Pipe Filling: Fill a piping bag with no-bake cheesecake mixture and pipe it into each cone evenly.
- Top Cones: Garnish each cone with additional strawberry crunch topping, a dollop of strawberry compote, and fresh sliced strawberries.
- Serve: Enjoy the strawberry crunch cheesecake cones immediately for best texture and freshness.
Notes
- Ensure cream cheese is at room temperature for a smooth filling.
- Chilling the no-bake cheesecake mixture briefly can help if it feels too soft for piping.
- Use a piping bag with a wide round tip to fill cones cleanly and evenly.
- Store assembled cones in the refrigerator and consume within 24 hours to maintain texture and flavor.
- This dessert is best eaten immediately to keep the cones crunchy and prevent sogginess.
- Prep Time: 20 minutes
- Cook Time: 25 minutes
- Category: Dessert
- Method: No-Cook
- Cuisine: American
Keywords: strawberry cheesecake cones, no bake cheesecake, waffle cones dessert, strawberry compote, Oreo crust dessert


