Description
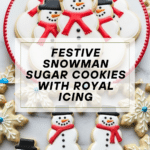
These charming Snowman Sugar Cookies are a delightful holiday treat featuring a soft buttery base with festive royal icing decorations. Perfect for Christmas parties or seasonal gifting, these cookies combine classic sugar cookie flavors with colorful, fun designs including snowmen adorned with hats, scarves, and carrot noses. The recipe involves making a tender sugar cookie dough, chilling and rolling it for sturdy cutting, baking until lightly golden, and decorating with vibrant royal icing for a whimsical presentation.
Ingredients
Scale
Cookie Dough
- 2 and 1/4 cups (281g) all-purpose flour (spooned & leveled), plus more as needed for rolling and work surface
- 1/2 teaspoon baking powder
- 1/4 teaspoon salt
- 3/4 cup (12 Tbsp; 170g) unsalted butter, softened to room temperature
- 3/4 cup (150g) granulated sugar
- 1 large egg, at room temperature
- 2 teaspoons pure vanilla extract
- 1/4 or 1/2 teaspoon almond extract (optional, but makes the flavor outstanding)
Royal Icing & Decorations
- Royal icing (enough to decorate cookies; recipe not detailed here but typical ingredients: powdered sugar, meringue powder or egg whites, and water)
- Red gel food coloring
- Black gel food coloring
- Orange gel food coloring
Instructions
- Mix Dry Ingredients: Whisk together the all-purpose flour, baking powder, and salt in a medium bowl until evenly combined. Set aside for later use.
- Cream Butter and Sugar: In a large mixing bowl, use a handheld or stand mixer fitted with a paddle attachment to beat the softened unsalted butter and granulated sugar on high speed until the mixture is completely smooth and creamy, about 2 minutes.
- Add Wet Ingredients: Add the room-temperature egg, pure vanilla extract, and optional almond extract to the creamed butter and sugar. Beat on high speed until everything is incorporated, about 1 minute. Scrape down the sides and bottom of the bowl and mix again as needed to ensure full mixing.
- Combine Wet and Dry: Slowly add the flour mixture to the wet ingredients and mix on low speed until just combined. The dough will be soft; if it feels excessively sticky, incorporate an additional tablespoon of flour.
- Divide and Roll Dough: Divide the dough into two equal portions. Place each portion between lightly floured parchment papers or silicone baking mats and roll out to about 1/4-inch thickness using a floured rolling pin. Adjust flour as needed to prevent sticking.
- Chill Dough: Lightly dust one rolled dough with flour and place a sheet of parchment on top. Stack the second rolled dough on top. Cover with plastic wrap or aluminum foil and refrigerate for at least 1 to 2 hours, or up to 2 days, to firm up the dough.
- Preheat Oven and Prepare Baking Sheets: Remove dough from refrigerator just before baking. Preheat oven to 350°F (177°C). Line two large baking sheets with parchment paper or silicone mats.
- Cut Shapes: Separate the top dough sheet if sticking by gently running your hand underneath. Use a snowman-shaped cookie cutter to cut shapes. Re-roll leftover dough scraps to continue cutting until all dough is used. Arrange cookies about 3 inches apart on prepared baking sheets.
- Bake Cookies: Bake cookies for 11-12 minutes until edges are lightly browned. For even baking, rotate sheets halfway through if your oven has hot spots. Let cookies cool on baking sheets for 5 minutes, then transfer to wire racks to cool completely.
- Prepare Colored Royal Icing: Divide royal icing into small bowls for coloring. Leave one white, tint the others with red, black, and orange gel food coloring until desired shades are achieved. Use dark gray for black to account for darkening as it dries.
- Decorate with White Icing: Fit a piping bag with Wilton tip #4 or #5, fill with white icing, and pipe borders then flood the surface of each cookie, leaving room for hats. Allow the white icing to set, refrigerating cookies to speed the process.
- Decorate with Colored Icing: Fill piping bags with red, black, and orange icing. Use tip #1 for fine details like hats, eyes, mouth, and buttons in black, and for noses in orange. Use tip #4 or #5 for piping red scarves. Utilize couplers if you have one tip to switch colors easily.
- Allow Icing to Set: Let decorated cookies dry at room temperature for 2-3 hours until icing is completely set and hardened.
- Storage and Serving: Enjoy cookies immediately or wait until icing sets before serving or gifting. Store decorated or plain cookies in a tightly sealed container at room temperature for up to 5 days, or refrigerate for up to 10 days for longer freshness.
Notes
- If dough is too sticky for rolling, add extra flour 1 tablespoon at a time to prevent sticking without compromising softness.
- Chilling the dough for at least 1-2 hours firms it up for cleaner cookie cutting and better shape retention during baking.
- Rotating baking sheets halfway through baking ensures even color and bake, especially in ovens with hot spots.
- Use gel food coloring to achieve vibrant hues without thinning the royal icing.
- Decorate with piping tips appropriate for sizes needed; couplers help to switch tips easily if you only have one.
- Cookies remain soft for about 5 days when stored at room temperature in a sealed container and up to 10 days refrigerated.
- Optional almond extract enhances flavor but can be omitted if preferred.
- Prep Time: 20 minutes
- Cook Time: 12 minutes
- Category: Dessert
- Method: Baking
- Cuisine: American
Keywords: snowman sugar cookies, holiday cookies, Christmas cookies, decorated sugar cookies, royal icing cookies, festive cookies, holiday baking