
Salted Daikon Salad (Shio Momi Daikon) Recipe
Introduction
Salted Daikon Salad, or Shio Momi Daikon, is a simple and refreshing Japanese side dish that highlights the crisp texture and mild sweetness of daikon radish. Lightly salted and gently squeezed, this salad offers a perfect balance of flavors and a subtle tang when garnished with lemon zest.

Ingredients
- 200g (7.1oz) daikon (a fat 5cm/2″-long disc or 2 thin 5cm/2″-long discs, skin removed)
- 40g (1.4oz) daikon leaves
- 2.5-3.5g (0.09-0.12oz) salt
- Lemon zest (for garnish, optional)
Instructions
- Step 1: Slice the daikon vertically into 3mm (⅛”) thick slices, then cut those slices into 3mm-thick batons.
- Step 2: Chop the daikon leaves into 3-5mm (⅛-3⁄16″) pieces.
- Step 3: Combine the daikon batons, daikon leaves, and salt in a bowl. Mix thoroughly to distribute the salt evenly.
- Step 4: Let the mixture sit for 10 minutes allowing the daikon to wilt and release moisture.
- Step 5: Take a handful of the daikon and squeeze out most of the water. Taste the salad and add a little more salt if desired, then mix again.
- Step 6: Serve the salad in a bowl, optionally garnishing with a small amount of lemon zest for added brightness.
Tips & Variations
- Use a gentle but firm squeeze when draining the daikon to maintain some crunch while removing excess moisture.
- For extra flavor, add a splash of rice vinegar or a sprinkle of toasted sesame seeds before serving.
- If daikon leaves are unavailable, substitute with mild greens like spinach or baby kale for a similar texture.
Storage
Store the salad in an airtight container in the refrigerator for up to 2 days. It is best enjoyed fresh, but you can gently re-squeeze before serving if it has released excess water. Avoid freezing as the texture will deteriorate.
How to Serve

Serve this delicious recipe with your favorite sides.
FAQs
Can I use regular radishes instead of daikon?
Regular radishes have a sharper, more peppery taste and a different texture, so the salad will be less mild and crispy. Daikon is preferred for its subtle sweetness and juiciness in this recipe.
Why do I need to salt and squeeze the daikon?
Salting draws out excess water from the daikon, concentrating its flavor and creating a pleasing texture. Squeezing removes the liquid to prevent the salad from becoming watery and helps the salt to season the daikon evenly.
Print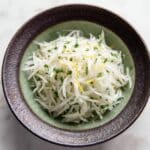
Salted Daikon Salad (Shio Momi Daikon) Recipe
- Total Time: 10 minutes
- Yield: 2 servings 1x
- Diet: Low Calorie
Description
Salted Daikon Salad (Shio Momi Daikon) is a simple and refreshing Japanese side dish featuring crisp daikon radish and its leafy greens, lightly salted to draw out moisture and enhance their natural flavors. This quick no-cook salad is perfect for a light appetizer or accompaniment to a meal, garnished with a hint of zesty lemon zest for added brightness.
Ingredients
Daikon and Leaves
- 200g (7.1oz) daikon, skin removed, cut into 3mm thick slices then into 3mm thick batons
- 40g (1.4oz) daikon leaves, cut into 3-5mm pieces
Seasoning
- 2.5–3.5g (0.09-0.12oz) salt
- Lemon zest (for garnish, optional)
Instructions
- Slice the daikon: Slice the peeled daikon vertically into 3mm (⅛”) thick slices, then cut these slices vertically into 3mm thick batons to create uniform strips.
- Prepare the leaves: Cut the daikon leaves into small pieces about 3-5mm (⅛-3⁄16″) in size.
- Mix with salt: Place the daikon batons, daikon leaves, and salt into a mixing bowl. Thoroughly combine so the salt is evenly distributed throughout the vegetables.
- Let it wilt: Allow the salted mixture to rest for 10 minutes. This resting period helps the daikon wilt and release much of its water content.
- Squeeze out water: Take handfuls of the salted daikon and gently squeeze most of the extracted water out. Taste the mixture and, if needed, add a bit more salt to suit your preference. Mix again to evenly distribute the seasoning.
- Serve with garnish: Transfer the salad to a serving bowl and optionally sprinkle with a small amount of fresh lemon zest to add a bright and fragrant finishing touch.
Notes
- Using thicker or thinner slices may affect texture and salt absorption.
- Daikon leaves add a fresh green flavor and are edible, but can be omitted if unavailable.
- The amount of salt can be adjusted based on taste preference and dietary needs.
- Properly squeezing the daikon ensures a crisp but not soggy salad.
- This salad is best served fresh but can be refrigerated for up to a day.
- Prep Time: 10 minutes
- Cook Time: 0 minutes
- Category: Salad
- Method: No-Cook
- Cuisine: Japanese
Keywords: Salted Daikon Salad, Shio Momi Daikon, Japanese salad, daikon recipe, no-cook salad, healthy salad, easy side dish


