
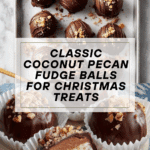
Retro Christmas Chocolate Coconut Pecan Balls Recipe
Introduction
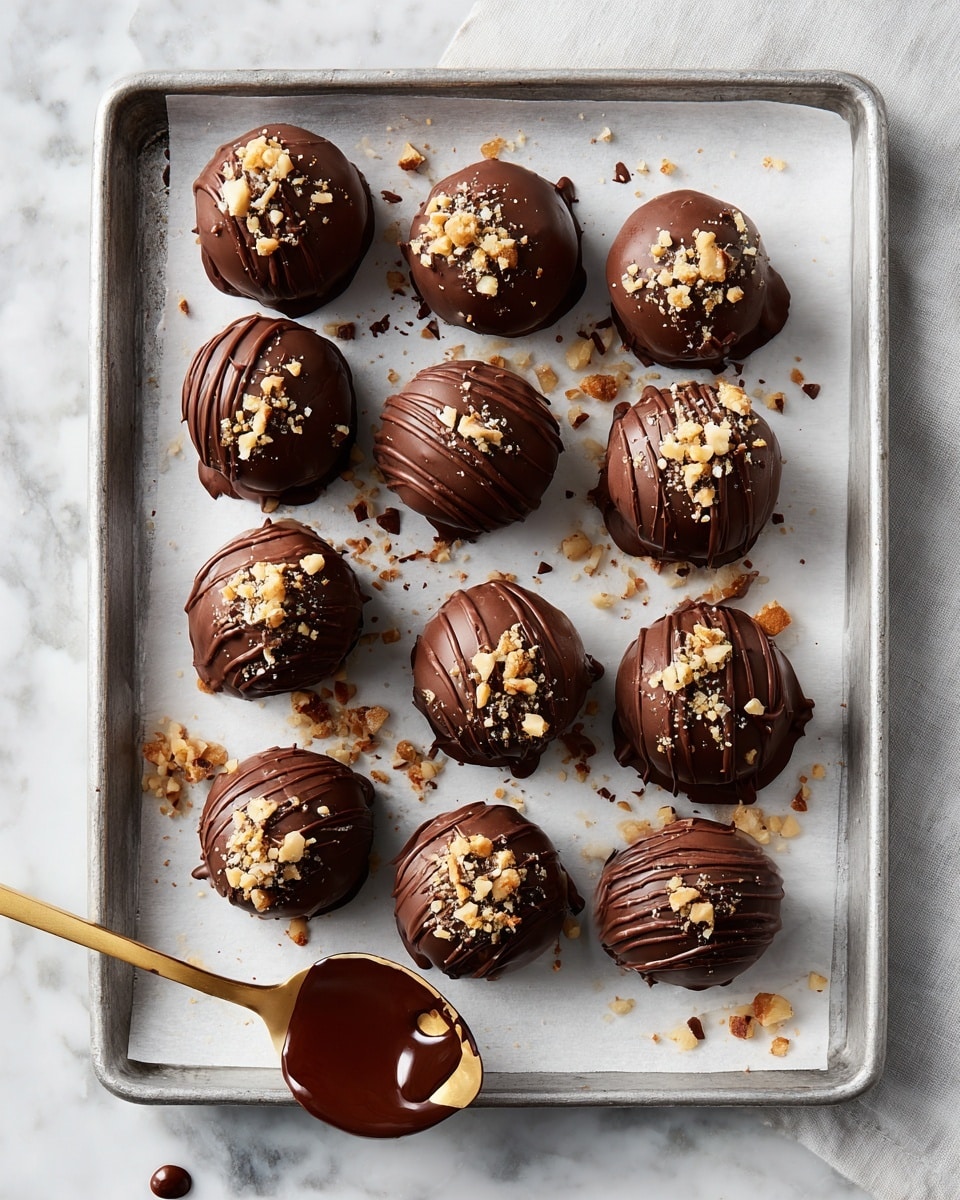
This retro dessert is a beloved holiday treat that I make every Christmas. It combines rich chocolate, toasted pecans, and coconut for a nostalgic bite that’s both sweet and satisfying. Perfect for sharing or enjoying with a cup of coffee during festive gatherings.
Ingredients
- 2 cups (227g) powdered sugar
- 4 tablespoons (1/2 stick) unsalted butter, melted
- 7 ounces (1/2 can) sweetened condensed milk
- 1/2 teaspoon vanilla extract
- 1 cup coconut flakes (sweetened or unsweetened)
- 1 cup chopped pecans
- 2 1/2 cups chocolate-flavored melting wafers (milk chocolate or dark chocolate)
- Optional toppings:
- Chopped pecans
- Coconut flakes
- Sprinkles
Instructions
- Step 1: In a medium bowl, whisk together powdered sugar, melted butter, sweetened condensed milk, and vanilla extract until fully combined. Fold in the coconut flakes and chopped pecans gently with a spatula. Cover the bowl with plastic wrap and refrigerate for at least 20 minutes to firm up.
- Step 2: Line a large baking sheet with parchment paper. Scoop portions of the chilled mixture using a small cookie scoop or teaspoon. Roll each portion into a ball by hand and place on the baking sheet. If the mixture softens too much, chill in the fridge briefly. Once all balls are shaped, refrigerate them uncovered for at least 30 minutes.
- Step 3: Divide the chocolate melting wafers evenly into two microwave-safe bowls. Melt the first batch of wafers according to package instructions. Remove the candy balls from the fridge; insert a toothpick into a ball and dip it into the melted chocolate to coat completely. Set the coated ball back on the parchment-lined sheet. Use a second toothpick to help release it if needed.
- Step 4: Immediately after dipping, spoon a little extra melted chocolate on top to cover the hole left by the toothpick. While the chocolate is still soft, sprinkle your choice of optional toppings such as chopped pecans, coconut flakes, or sprinkles. Repeat this process with the rest of the balls using the remaining chocolate, melting the second bowl as needed.
Tips & Variations
- Chill the mixture well before forming balls to make rolling easier and prevent melting.
- Use dark chocolate wafers for a richer flavor or milk chocolate for a sweeter taste.
- Try swapping pecans for walnuts or almonds to customize the nutty flavor.
- If you prefer a more pronounced coconut taste, toast the coconut flakes lightly before folding them in.
Storage
Store the coated candy balls in an airtight container in the refrigerator for up to two weeks. They can also be frozen for longer storage; thaw in the refrigerator before serving. To enjoy, let them sit at room temperature for a few minutes to soften slightly.
How to Serve

Serve this delicious recipe with your favorite sides.
FAQs
Can I use regular chocolate instead of melting wafers?
Yes, you can use regular chocolate chips or bars, but melting wafers are formulated to melt smoothly and harden quickly, which helps create a shiny, even coating. If using regular chocolate, add a small amount of shortening or oil to achieve similar results.
Do these candy balls need to be refrigerated after they are coated?
Yes, refrigerating helps the chocolate coating harden and keeps the candy balls firm. They can be served chilled or at room temperature once set.
Print
Retro Christmas Chocolate Coconut Pecan Balls Recipe
- Total Time: 50 minutes
- Yield: Approximately 30 balls 1x
Description
This vintage-inspired Christmas dessert features creamy coconut and pecan balls covered in smooth chocolate. Combining powdered sugar, melted butter, sweetened condensed milk, coconut flakes, and chopped pecans, these bite-sized treats are chilled and then dipped in melted chocolate wafers for a festive, nostalgic holiday treat. Optional toppings like additional pecans, coconut flakes, or sprinkles add a personalized touch.
Ingredients
Filling
- 2 cups (227g) powdered sugar
- 4 tablespoons (1/2 stick) unsalted butter, melted
- 7 ounces (1/2 can) sweetened condensed milk
- 1/2 teaspoon vanilla extract
- 1 cup coconut flakes (sweetened or unsweetened)
- 1 cup chopped pecans
Coating
- 2 1/2 cups chocolate-flavored melting wafers (milk chocolate or dark chocolate)
Optional Toppings
- Chopped pecans
- Coconut flakes
- Sprinkles
Instructions
- Make the dough: In a medium bowl, whisk together the powdered sugar, melted butter, sweetened condensed milk, and vanilla extract until the mixture is smooth and fully combined. Gently fold in the coconut flakes and chopped pecans with a spatula. Cover the bowl with plastic wrap and refrigerate for at least 20 minutes to allow the mixture to firm up.
- Make the balls: Line a large baking sheet with parchment paper. Using a small cookie scoop or teaspoon, scoop portions of the chilled mixture and roll each portion gently in your hands to form balls. Place the balls on the prepared baking sheet. If the mixture becomes too warm, refrigerate it again until firm. Once all balls are rolled, chill them uncovered in the refrigerator for at least 30 minutes to set.
- Coat the balls: Divide the chocolate melting wafers evenly into two microwave-safe bowls. Follow the instructions on the wafers package to melt the chocolate. Remove the chilled balls from the refrigerator. Insert a toothpick into the center of a ball and dip it into the melted chocolate, spooning chocolate over any uncovered spots. Place the coated ball back on the parchment paper. Use a second toothpick to gently loosen balls if needed. Repeat for each ball, melting the second batch of wafers as you go.
- Add toppings: Immediately after dipping each ball, swirl a little extra melted chocolate on top to cover the toothpick hole. While the chocolate coating is still wet, sprinkle your choice of chopped pecans, coconut flakes, or sprinkles over each ball to decorate. Allow the chocolates to harden at room temperature or refrigerate briefly before serving.
Notes
- Use sweetened or unsweetened coconut flakes based on your taste preference.
- Chill the dough and balls thoroughly to make them easier to shape and coat.
- Work in small batches when melting the chocolate to prevent it from hardening before dipping.
- Keep extra toppings ready to apply immediately after dipping for the best adherence.
- Store finished chocolate balls in an airtight container in the refrigerator to maintain freshness and shape.
- Prep Time: 15 minutes
- Cook Time: 15 minutes
- Category: Dessert
- Method: No-Cook
- Cuisine: American
Keywords: Christmas dessert, coconut pecan balls, chocolate-coated treats, holiday sweets, retro dessert