
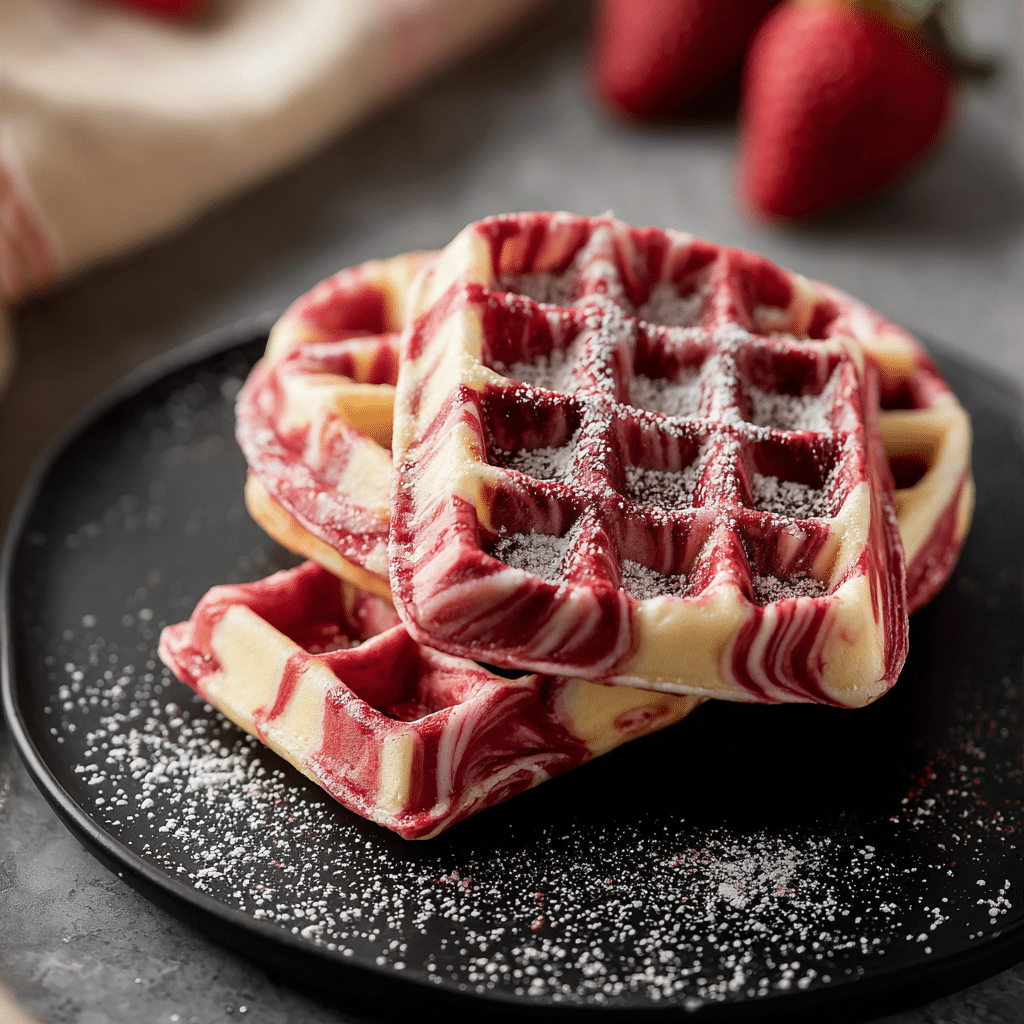
Red Velvet Marble Waffles Recipe
If you’re craving something that feels both indulgent and playful, these Red Velvet Marble Waffles are an absolute must-try. Imagine fluffy, perfectly crisp waffles swirled with the rich, velvety flavor of red velvet cake, resulting in a stunning marbled effect that’s as delightful to the eyes as it is to the taste buds. They bring together the classic warmth of breakfast with the nostalgic charm of a favorite dessert, making every bite a true celebration. Whether it’s a weekend treat or a special occasion breakfast, these Red Velvet Marble Waffles are going to steal the show on your table.
Ingredients You’ll Need
The beauty of Red Velvet Marble Waffles is how straightforward the ingredients are, yet each plays a crucial role in creating that perfect texture, decadent flavor, and vibrant color. From the simple beauty of all-purpose flour to the luscious cream cheese glaze, every component is essential to make these waffles unforgettable.
- All-purpose flour: Forms the base for both the classic and red velvet batters, providing structure and tenderness.
- Granulated sugar: Adds the subtle sweetness that balances the cocoa and vanilla notes beautifully.
- Baking powder: Gives the waffles their irresistible rise and fluffiness.
- Salt: Enhances all the other flavors and keeps the batter balanced.
- Egg: Binds the ingredients while lending richness and moisture to the batter.
- Milk and buttermilk: The buttermilk in the red velvet batter adds a slight tang that’s signature to red velvet flavor, while the regular milk helps keep the classic batter perfectly smooth.
- Unsalted butter, melted: Adds richness and ensures the waffles have a tender crumb and crispy edges.
- Vanilla extract: Infuses warmth and rounds out the flavors.
- Cocoa powder: Gives the red velvet portion its distinctive chocolate undertone.
- Red food coloring: The secret to that vivid red hue which makes these waffles extra special.
- Cream cheese glaze (optional): Made from softened cream cheese, powdered sugar, milk, and vanilla to drizzle on top for a luscious finishing touch.
How to Make Red Velvet Marble Waffles
Step 1: Prepare the Classic Waffle Batter
Begin by whisking together the dry ingredients—flour, sugar, baking powder, and salt—in one bowl. In a separate bowl, beat the egg and blend in the milk, melted butter, and vanilla extract. Gradually combine the wet and dry ingredients, stirring gently until just combined. The key here is to avoid overmixing, so your waffles stay light and fluffy.
Step 2: Prepare the Red Velvet Batter
For the red velvet batter, repeat the same process but now add cocoa powder to your dry ingredients for that subtle chocolate flavor. Mix the wet ingredients, including buttermilk, egg, melted butter, vanilla, and the all-important red food coloring to achieve that gorgeous red shade. Combine wet and dry ingredients until just mixed, ensuring the batter remains smooth.
Step 3: Preheat Your Waffle Iron
The waffle iron needs to be hot and ready for action. Follow your manufacturer’s instructions for preheating to ensure it reaches the perfect temperature for cooking these lovely batters into crispy, golden waffles.
Step 4: Create the Marble Effect
Here’s where the fun truly begins. Alternate spoonfuls of the classic and red velvet batters onto your waffle iron in a pattern you like. Then, take a skewer or a toothpick and swirl the two together gently to form beautiful marbled patterns. This mixing technique guarantees every bite has that enchanting blend of red velvet and vanilla goodness.
Step 5: Cook Until Golden
Close the waffle iron and cook according to your device’s instructions. This usually takes about five minutes. You want the waffles to be golden brown on the outside while cooked through and tender on the inside. Each waffle should look like a work of art with the red and classic batters beautifully marbled.
Step 6: Prepare the Cream Cheese Glaze (Optional)
For an extra touch of indulgence, whip up the cream cheese glaze by beating softened cream cheese with powdered sugar, a splash of milk, and vanilla extract until smooth. This glaze complements the Red Velvet Marble Waffles perfectly, adding a creamy, tangy sweetness on top.
How to Serve Red Velvet Marble Waffles
Garnishes
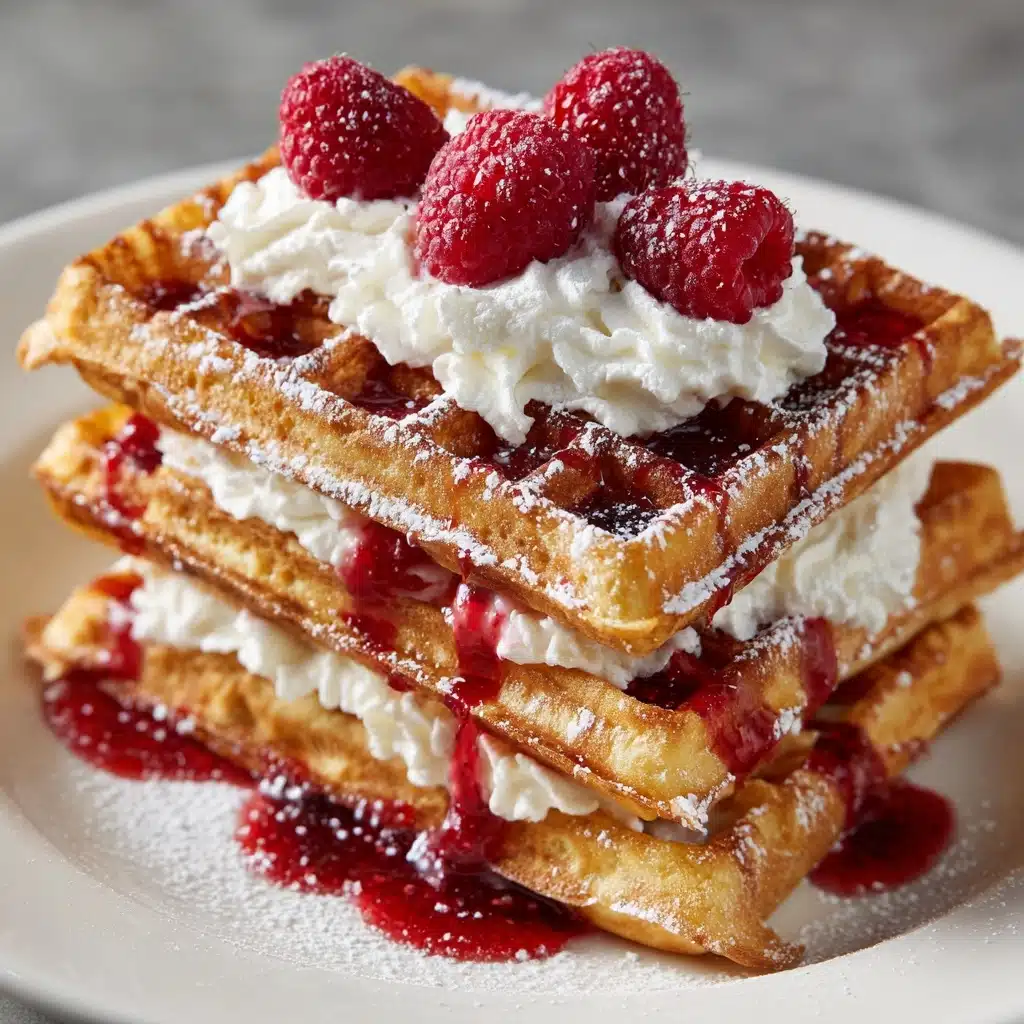
Top your Red Velvet Marble Waffles with a drizzle of cream cheese glaze for a luscious, silky finish. Fresh berries such as strawberries, raspberries, or blueberries add a vibrant burst of color and juicy brightness that balances the richness of the waffles. A sprinkle of powdered sugar also adds a pretty dusting to impress anyone at the table.
Side Dishes
Keep things simple with crispy bacon or a side of sausage for a savory contrast, or enjoy them alongside a bowl of fresh fruit salad for a lighter, refreshing complement. A dollop of whipped cream or a scoop of vanilla ice cream can transform this breakfast treat into a dessert-worthy delight any time of day.
Creative Ways to Present
Layer your Red Velvet Marble Waffles with mascarpone and berries to create a waffle stack parfait, or use cookie cutters to cut fun shapes for kids’ breakfasts or parties. Serve them on a wooden board with a variety of toppings in little bowls, creating a waffle bar where everyone can customize their own perfect bite.
Make Ahead and Storage
Storing Leftovers
If you have any leftover Red Velvet Marble Waffles, store them in an airtight container in the refrigerator. They’ll stay fresh for up to two days, making for a quick and delicious breakfast the next morning.
Freezing
To enjoy these waffles later, freeze them individually on a baking sheet before transferring them into a freezer-safe bag. This method prevents them from sticking together and lets you grab as many as you need for a fast, tasty treat anytime. They can be frozen for up to two months without losing flavor or texture.
Reheating
Reheat your Red Velvet Marble Waffles in a toaster or an oven preheated to 350°F (175°C) for about 5-7 minutes, or until warmed through and crisp again. Avoid microwaving, as this can make them soggy and take away the crispy edges that make waffles so irresistible.
FAQs
Can I make Red Velvet Marble Waffles without food coloring?
Absolutely! While the vibrant red is a classic feature, you can skip the food coloring and still enjoy delicious marbled chocolate and vanilla waffles. The color won’t be as striking, but the flavor remains delightful.
Can I use a box mix for the batter?
While box mixes can work in a pinch, making your own batter from scratch ensures you get the best texture, flavor, and marbling effect. Plus, it’s fun to customize and control the ingredients you use.
What can I substitute for buttermilk?
If you don’t have buttermilk on hand, mix 3/4 cup milk with 1 tablespoon of lemon juice or white vinegar. Let it sit for 5 minutes before using to mimic buttermilk’s tangy effect in the red velvet batter.
Is the cream cheese glaze necessary?
The cream cheese glaze is optional but highly recommended. It adds a smooth, tangy sweetness that perfectly complements the rich waffles. That said, these waffles are delicious even on their own or topped with whipped cream or syrup.
Can I use a regular waffle iron for this recipe?
Yes! This recipe is designed for standard waffle irons, whether classic or Belgian style. Just remember to adjust cooking time based on your specific appliance to avoid undercooked or overly crispy waffles.
Final Thoughts
I cannot recommend enough giving the Red Velvet Marble Waffles a try—these treats bring a burst of color, a wave of flavor, and a whole lot of joy to any meal. They’re perfect for family breakfasts, brunch gatherings, or whenever you want to treat yourself with a little something extraordinary. Whip up this recipe, share it with loved ones, and watch it become a favorite in your kitchen too.
Print
Red Velvet Marble Waffles Recipe
- Total Time: 20 minutes
- Yield: 4 waffles (depends on waffle iron size) 1x
- Diet: Vegetarian
Description
Delight in these Red Velvet Marble Waffles, combining classic waffle batter with a rich red velvet twist. Swirled together to create a stunning marble effect and topped with an optional smooth cream cheese glaze, these waffles make a perfect treat for breakfast or brunch.
Ingredients
Classic Waffle Batter
- 1 cup all-purpose flour
- 2 tablespoons granulated sugar
- 1 tablespoon baking powder
- 1/4 teaspoon salt
- 1 egg
- 3/4 cup milk
- 1/4 cup unsalted butter, melted
- 1 teaspoon vanilla extract
Red Velvet Batter
- 1 cup all-purpose flour
- 2 tablespoons cocoa powder
- 1/4 cup granulated sugar
- 1 tablespoon baking powder
- 1/4 teaspoon salt
- 1 egg
- 3/4 cup buttermilk
- 1/4 cup unsalted butter, melted
- 1 teaspoon vanilla extract
- 2 tablespoons red food coloring
Cream Cheese Glaze (Optional)
- 4 ounces cream cheese, softened
- 1/2 cup powdered sugar
- 1–2 tablespoons milk
- 1/2 teaspoon vanilla extract
Instructions
- Prepare Classic Batter: In a large bowl, whisk together the all-purpose flour, granulated sugar, baking powder, and salt. In a separate bowl, beat the egg, then add milk, melted butter, and vanilla extract. Combine wet and dry ingredients and stir until just mixed, being careful to avoid overmixing.
- Prepare Red Velvet Batter: In another bowl, combine all-purpose flour, cocoa powder, granulated sugar, baking powder, and salt. In a separate bowl, beat the egg with buttermilk, melted butter, vanilla extract, and red food coloring until smooth. Mix wet and dry ingredients until just combined.
- Preheat Waffle Iron: Turn on your waffle iron and let it heat according to the manufacturer’s instructions to ensure even cooking and crisp waffles.
- Pour and Marble Batter: Alternately spoon the classic batter and red velvet batter onto the waffle iron surface. Use a skewer or knife to gently swirl the two batters together, creating a beautiful marble pattern without fully blending them.
- Cook Waffles: Close the waffle iron and cook for approximately 5 minutes or until the waffles are golden brown and cooked through. Cooking time may vary depending on your waffle iron.
- Make Cream Cheese Glaze (Optional): In a bowl, beat together softened cream cheese, powdered sugar, milk, and vanilla extract until smooth and creamy. Adjust milk to achieve desired consistency.
- Serve: Remove waffles carefully from the iron and plate them. Drizzle generously with cream cheese glaze and, if desired, garnish with fresh berries or whipped cream for an extra special touch. Serve warm.
Notes
- Do not overmix batters to keep waffles light and fluffy.
- Use buttermilk for the red velvet batter to enhance its tangy flavor and tender crumb.
- If you don’t have buttermilk, you can substitute with milk plus 1 tablespoon vinegar or lemon juice per cup.
- Red food coloring is key to achieving the classic red velvet color.
- These waffles freeze well; just reheat in a toaster or oven.
- For a dairy-free version, substitute milk and butter with plant-based alternatives and omit the cream cheese glaze or use vegan cream cheese.
- Prep Time: 15 minutes
- Cook Time: 5 minutes per waffle
- Category: Breakfast, Brunch
- Method: Waffle Iron
- Cuisine: American
Nutrition
- Serving Size: 1 waffle with glaze
- Calories: 350
- Sugar: 15g
- Sodium: 350mg
- Fat: 18g
- Saturated Fat: 9g
- Unsaturated Fat: 7g
- Trans Fat: 0g
- Carbohydrates: 38g
- Fiber: 2g
- Protein: 7g
- Cholesterol: 60mg
Keywords: Red velvet waffles, marble waffles, breakfast waffles, cream cheese glaze, brunch recipe, red velvet recipe
