
Peppermint Brownies Recipe
Introduction
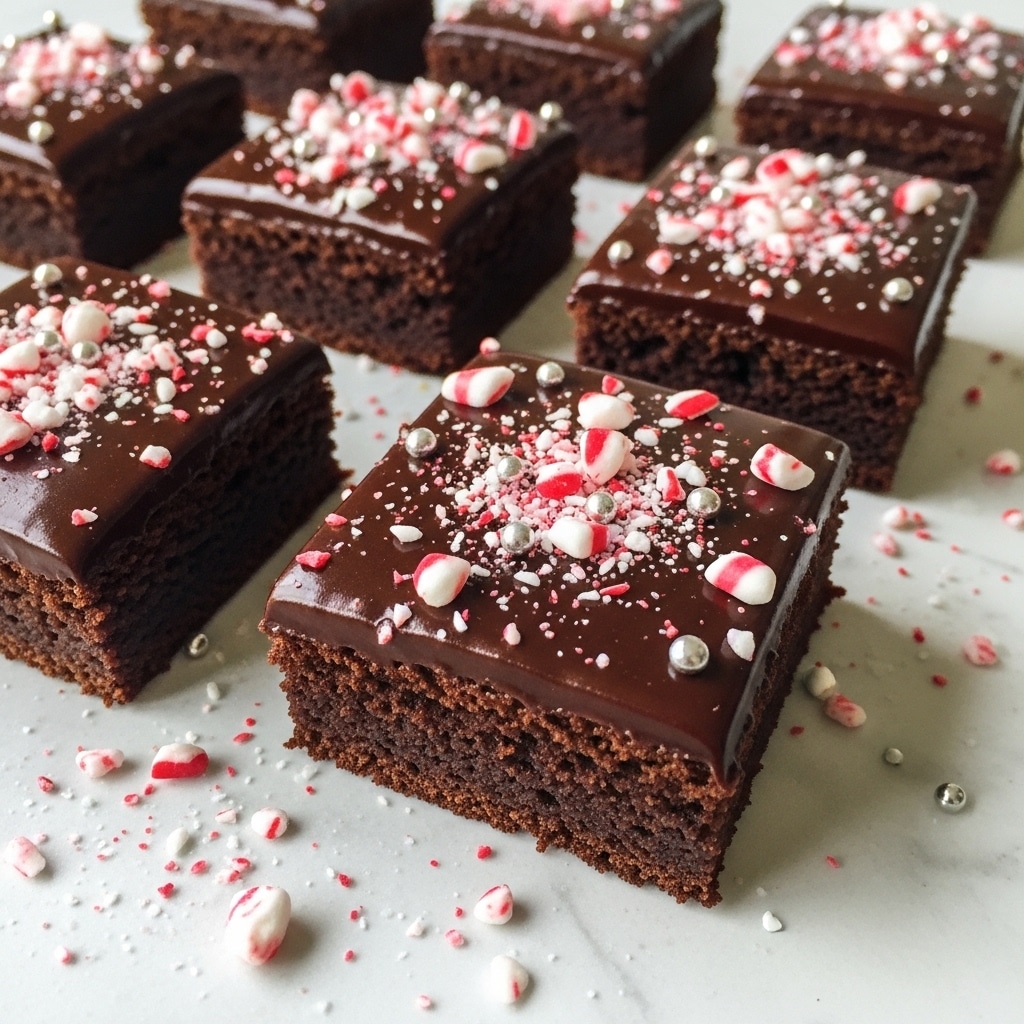
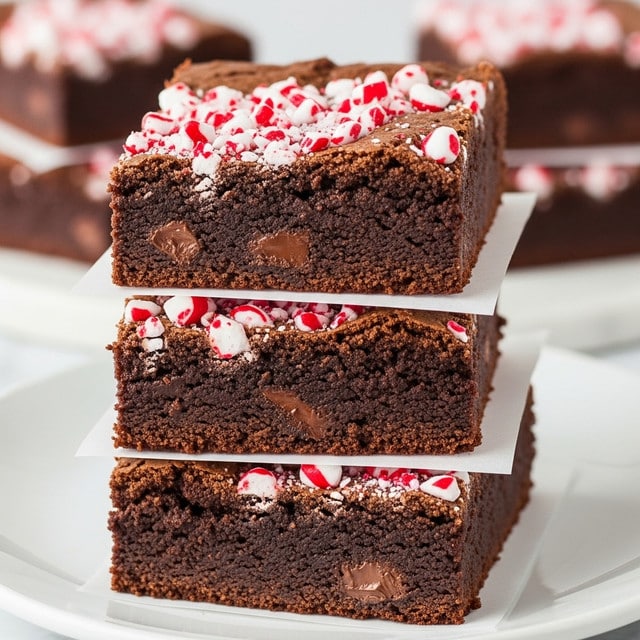
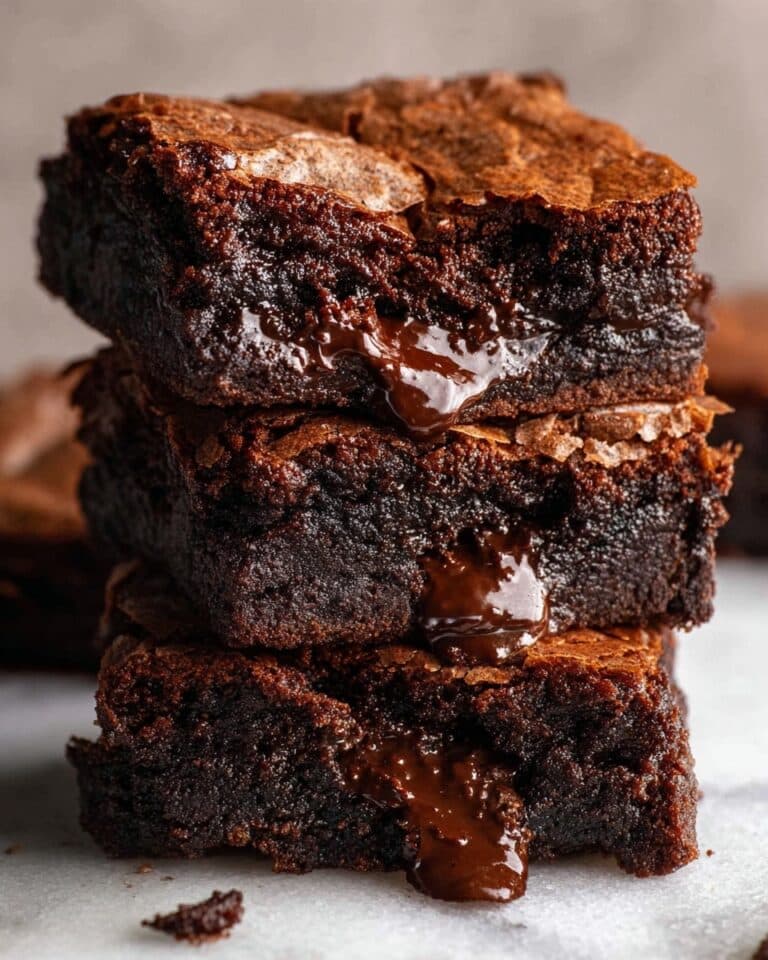
These peppermint brownies combine rich dark chocolate with refreshing peppermint for a festive twist on a classic treat. Topped with a smooth chocolate ganache and crushed candy canes, they make an irresistible dessert perfect for the holidays or any special occasion.
Ingredients
- 6 oz. dark chocolate, coarsely chopped
- ½ cup (4 oz.) unsalted butter
- ¾ cup (5¼ oz.) granulated sugar
- ¼ cup (2 oz.) light brown sugar
- 2 eggs
- 1 teaspoon vanilla extract
- 1 teaspoon peppermint extract
- ½ teaspoon salt
- 1 tablespoon cocoa powder
- ⅔ cup (2¾ oz.) all-purpose flour
- ½ cup Andes mint chips
- 4 oz. dark chocolate (for ganache)
- ¼ cup heavy cream
- Crushed candy canes (for topping)
Instructions
- Step 1: Preheat the oven to 350ºF. Line an 8×8” baking pan with parchment paper and lightly grease it.
- Step 2: In a medium bowl, whisk together the flour, salt, and cocoa powder.
- Step 3: Place the chopped dark chocolate and butter in a large glass bowl. Microwave for 30 seconds, stir, and repeat until melted and smooth. Add both sugars and whisk until combined. Allow the mixture to reach room temperature.
- Step 4: Whisk in the eggs until combined. Stir in the vanilla and peppermint extracts carefully, avoiding overmixing to keep the brownies fudgy.
- Step 5: Sprinkle the flour mixture over the chocolate mixture. Using a rubber spatula, gently fold the flour in until a bit of it remains visible. Fold in the Andes mint chips. Spread the batter evenly in the prepared pan.
- Step 6: Bake for about 30 minutes, or until a toothpick inserted comes out with moist crumbs attached. Let the brownies cool completely.
- Step 7: Heat the heavy cream in the microwave until bubbling (about 30 seconds). Add the 4 oz. dark chocolate, let sit for 1 minute, then stir until smooth. Spread this ganache evenly over the cooled brownies and sprinkle with crushed candy canes.
- Step 8: Refrigerate for at least 1 hour, or until the ganache is set. Cut into 16 equal squares with a very sharp knife.
Tips & Variations
- For a stronger peppermint flavor, add an extra ½ teaspoon of peppermint extract.
- You can substitute Andes mint chips with regular chocolate chips for a less minty version.
- Use a serrated knife to cut through the ganache cleanly without cracking.
Storage
Store brownies in an airtight container at room temperature or in the refrigerator for up to 1 week. For longer storage, freeze them for up to 3 months. Thaw at room temperature before serving. Reheat briefly in the microwave for a warm, gooey treat.
How to Serve
Serve this delicious recipe with your favorite sides.
FAQs
Can I use regular chocolate instead of dark chocolate?
Yes, you can substitute semi-sweet or milk chocolate if you prefer a sweeter brownie, but dark chocolate balances well with the peppermint for a rich flavor.
What if I don’t have Andes mint chips?
If Andes mint chips aren’t available, you can use chopped peppermint bark, crushed peppermint candies, or mint chocolate chips as a tasty alternative.
Print
Peppermint Brownies Recipe
- Total Time: 1 hour 45 minutes
- Yield: 16 brownies 1x
Description
These Peppermint Brownies combine the rich, fudgy texture of dark chocolate brownies with refreshing peppermint flavor and a creamy chocolate ganache topping, finished with crunchy crushed candy canes for a festive treat perfect for holidays and special occasions.
Ingredients
Brownie Batter
- 6 oz. dark chocolate, coarsely chopped
- ½ cup (4 oz.) unsalted butter
- ¾ cup (5¼ oz.) granulated sugar
- ¼ cup (2 oz.) light brown sugar
- 2 eggs
- 1 teaspoon vanilla extract
- 1 teaspoon peppermint extract
- ½ teaspoon salt
- 1 tablespoon cocoa powder
- ⅔ cup (2¾ oz.) all-purpose flour
- ½ cup Andes mint chips
Ganache Topping
- 4 oz. dark chocolate
- ¼ cup heavy cream
- Crushed candy canes
Instructions
- Prepare Baking Pan: Preheat your oven to 350ºF (175ºC). Line an 8×8-inch baking pan with parchment paper and lightly grease it to prevent sticking.
- Mix Dry Ingredients: In a medium bowl, whisk together the all-purpose flour, salt, and cocoa powder to ensure they are evenly combined.
- Melt Chocolate and Butter: Place the chopped dark chocolate and unsalted butter in a large glass bowl. Microwave in 30-second intervals, stirring between each, until completely melted and smooth. Allow the mixture to cool to room temperature before proceeding.
- Add Sugars and Eggs: Whisk the granulated and light brown sugars into the melted chocolate mixture until fully combined. Then, add the eggs one at a time, whisking after each addition until combined. Stir in vanilla and peppermint extracts carefully, avoiding overmixing to maintain a fudgy brownie texture.
- Combine Wet and Dry: Sprinkle the flour mixture over the chocolate mixture. Use a rubber spatula to gently fold the dry ingredients into the wet until just a bit of flour is still visible. Fold in the Andes mint chips evenly throughout the batter. Spread the batter evenly in the prepared baking pan.
- Bake Brownies: Place the pan in the preheated oven and bake for about 30 minutes, or until a toothpick inserted into the center comes out with moist crumbs attached. Remove from the oven and cool the brownies completely in the pan.
- Prepare Ganache: Heat the heavy cream in the microwave for approximately 30 seconds until it’s bubbling. Add the dark chocolate and let it sit for 1 minute to soften, then stir until smooth and glossy.
- Apply Ganache and Candy Canes: Spread the ganache evenly over the cooled brownies. Sprinkle crushed candy canes on top for a festive crunch.
- Set and Serve: Refrigerate the brownies for at least 1 hour or until the ganache has fully set. Cut into 16 equal squares with a very sharp knife and serve.
- Storage: Store the brownies in an airtight container at room temperature or in the refrigerator for up to 1 week. For longer storage, freeze for up to 3 months.
Notes
- Do not overbeat the batter to avoid cakey brownies; fold ingredients gently.
- Allow the chocolate and butter mixture to cool to room temperature before adding eggs to prevent curdling.
- Use a sharp knife warmed in hot water to cut clean brownie squares after ganache sets.
- Andes mint chips add a creamy mint flavor, but you can substitute with chopped peppermint chocolates if desired.
- Crushed candy canes add both texture and festive look; adjust quantity based on preference.
- Prep Time: 15 minutes
- Cook Time: 30 minutes
- Category: Dessert
- Method: Baking
- Cuisine: American
Keywords: peppermint brownies, chocolate brownies, holiday dessert, peppermint extract, Andes mint chips, chocolate ganache, festive brownies

