
Keto Coconut Cheesecake Recipe
Introduction
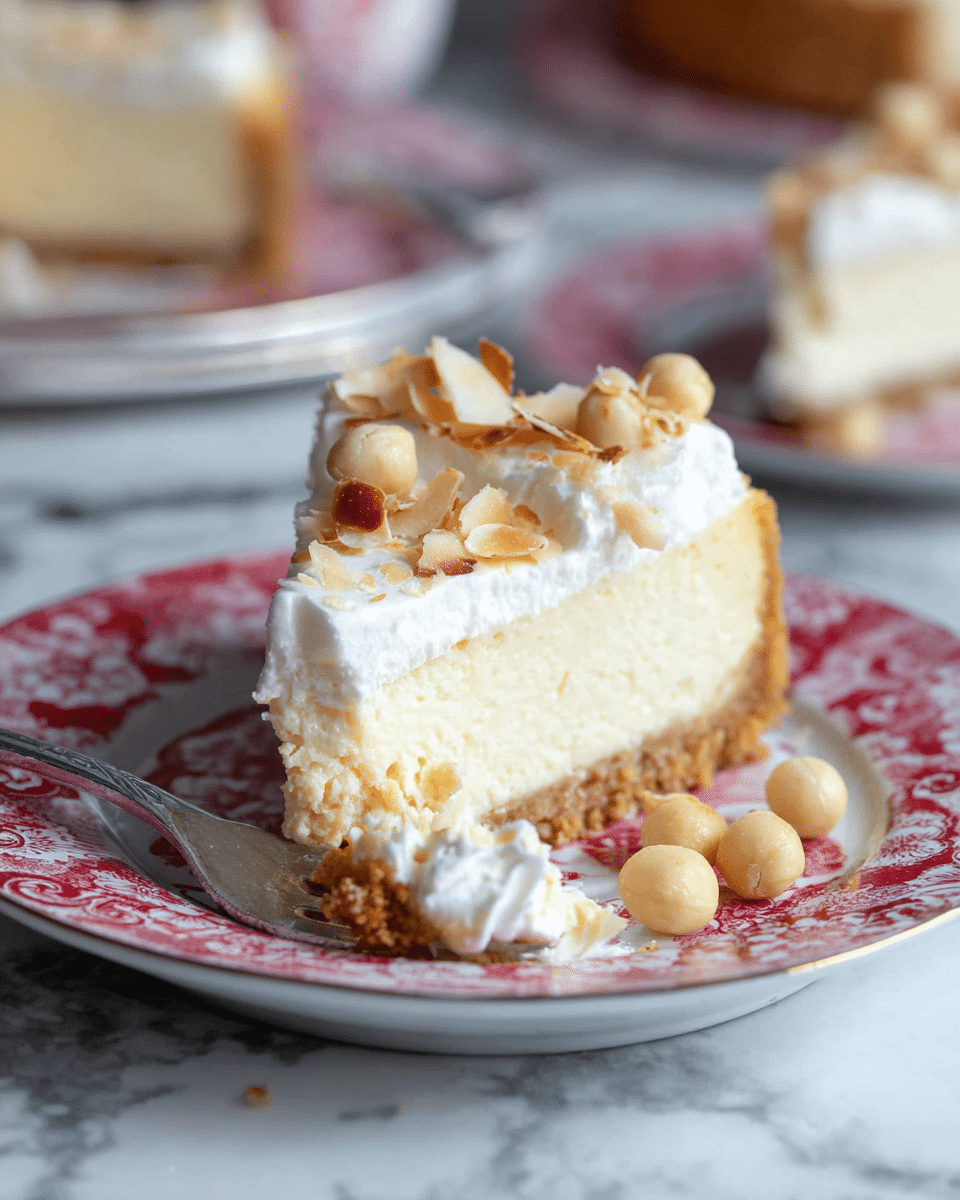
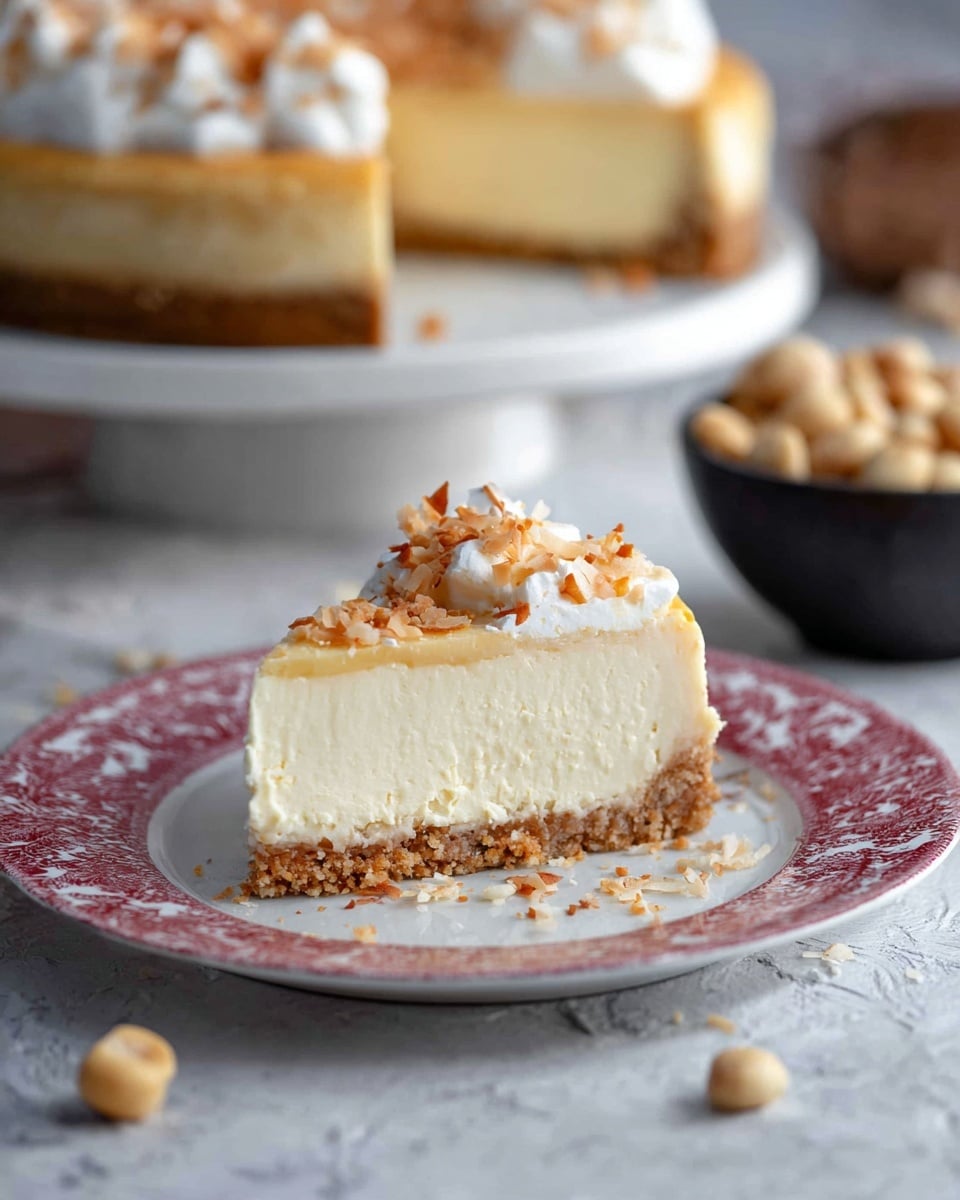
This Keto Coconut Cheesecake is a rich and creamy dessert perfect for anyone following a low-carb lifestyle. With a crunchy macadamia nut crust and a smooth coconut-flavored filling, it’s a tropical twist on a classic favorite that’s surprisingly simple to make.
Ingredients
- 3/4 cup raw macadamia nuts
- 3/4 cup finely shredded coconut (unsweetened)
- 3 tbsp granular sweetener
- 1/4 tsp salt
- 2 tbsp melted butter (or oil)
- 1 1/2 lbs cream cheese (very well softened)
- 2/3 cup granular sweetener (adjust to taste)
- 1/2 cup coconut cream (canned, room temperature)
- 1 tsp coconut extract
- 1/2 tsp vanilla extract
- 3 large eggs (room temperature)
- 3/4 cup whipping cream
- 2 tbsp powdered sweetener
- 1/2 tsp vanilla or coconut extract
- 1/2 cup large flaked coconut (lightly toasted)
Instructions
- Step 1: Preheat the oven to 325ºF and lightly grease a 9-inch springform pan. Line the bottom with parchment paper and grease the parchment. Set the pan on a large rimmed baking sheet.
- Step 2: In a food processor, pulse the macadamia nuts on high until they resemble coarse crumbs. Transfer to a bowl and stir in the shredded coconut, sweetener, and salt. Add the melted butter and mix well.
- Step 3: Firmly press the crust mixture evenly into the bottom of the prepared pan. Bake for 12 to 15 minutes or until the edges just begin to brown. Remove from the oven and let cool.
- Step 4: Reduce oven temperature to 300ºF.
- Step 5: In a large bowl, beat the cream cheese on medium speed for 1 to 2 minutes until smooth and creamy. Add the sweetener, coconut cream, coconut extract, and vanilla extract, mixing until combined. Taste and adjust sweetness and flavor as preferred.
- Step 6: Beat in the eggs one at a time, mixing just until incorporated. Be sure to scrape down the sides of the bowl after each addition.
- Step 7: Pour the filling over the cooled crust and spread evenly to the edges.
- Step 8: Place the pan (on the baking sheet) on the center rack of the oven. On the rack below, place a large baking dish filled with water to create steam.
- Step 9: Bake for 70 to 90 minutes, until the edges are set but the center still jiggles slightly when the pan is shaken gently. Remove from oven and let cool to room temperature.
- Step 10: Run a sharp knife around the edges of the pan and remove the springform sides. Cover the cheesecake with plastic wrap and refrigerate for at least 2 to 3 hours.
- Step 11: For the topping, beat the whipping cream, powdered sweetener, and vanilla or coconut extract in a large bowl until stiff peaks form. Spread the whipped cream over the chilled cheesecake.
- Step 12: Sprinkle the topping with toasted coconut flakes. To toast, heat the coconut flakes in a dry skillet over medium heat, shaking frequently, until they are lightly browned.
Tips & Variations
- Make sure the cream cheese and eggs are at room temperature to avoid lumps and ensure a smooth filling.
- Use your favorite granular and powdered sweeteners that work well for baking, such as erythritol or monk fruit, to keep it keto-friendly.
- For extra coconut flavor, you can substitute half the shredded coconut in the crust with finely chopped pecans or almonds.
- If you prefer a stronger coconut taste, increase the coconut extract slightly but be careful not to overpower the cheesecake.
Storage
Store the cheesecake covered in the refrigerator for up to 4 days. The crust may soften slightly over time but will remain delicious. When ready to serve, you can refresh the toasted coconut topping by quickly warming it in a dry skillet. For longer storage, the cheesecake can be frozen without the whipped cream topping for up to 1 month; thaw overnight in the refrigerator and add fresh whipped cream before serving.
How to Serve
Serve this delicious recipe with your favorite sides.
FAQs
Can I use a regular sweetener instead of keto-friendly sweetener?
Yes, you can use regular sugar or other sweeteners, but the carb count will increase and it may no longer be considered keto-friendly. Adjust according to your dietary needs.
Why is the cheesecake still jiggly in the center after baking?
The center should have a slight jiggle when done. It will continue to set as it cools and chills. Avoid overbaking to prevent cracking or dryness.
Print
Keto Coconut Cheesecake Recipe
- Total Time: 3 hours 55 minutes
- Yield: 12 servings 1x
- Diet: Low Carb
Description
This Keto Coconut Cheesecake is a rich, creamy dessert perfect for low-carb and keto diets. Featuring a macadamia nut and coconut crust, a smooth coconut-infused cream cheese filling, and a luscious whipped cream topping garnished with toasted coconut flakes, this cheesecake is both indulgent and sugar-conscious. Baked gently with a water bath to ensure a silky texture, it’s a tropical treat ideal for special occasions or anytime you crave a sweet keto-friendly dessert.
Ingredients
Crust
- 3/4 cup raw macadamia nuts
- 3/4 cup finely shredded unsweetened coconut
- 3 tbsp granular sweetener
- 1/4 tsp salt
- 2 tbsp melted butter (or oil)
Filling
- 1 1/2 lbs cream cheese, very well softened
- 2/3 cup granular sweetener (adjust to taste)
- 1/2 cup canned coconut cream, room temperature
- 1 tsp coconut extract
- 1/2 tsp vanilla extract
- 3 large eggs, room temperature
Topping
- 3/4 cup whipping cream
- 2 tbsp powdered sweetener
- 1/2 tsp vanilla or coconut extract
- 1/2 cup large flaked coconut, lightly toasted
Instructions
- Prepare the Crust: Preheat your oven to 325ºF (163ºC). Lightly grease a 9-inch springform pan and line the bottom with parchment paper; grease the parchment as well. Place the pan on a large rimmed baking sheet to catch any spills.
- Make the Crust Mixture: In a food processor, pulse the macadamia nuts until they become coarse crumbs. Transfer to a bowl, then stir in the shredded coconut, sweetener, and salt. Add the melted butter and blend thoroughly to combine all ingredients.
- Form and Bake the Crust: Press the crust mixture firmly and evenly into the bottom of the prepared pan. Bake for 12 to 15 minutes until the edges just begin to brown. Remove from oven and allow to cool completely.
- Prepare the Filling: Lower the oven temperature to 300ºF (149ºC). In a large mixing bowl, beat the cream cheese on medium speed for 1 to 2 minutes until it’s very creamy and smooth. Add the sweetener, coconut cream, coconut extract, and vanilla extract; mix until well incorporated. Taste and adjust sweetness or coconut flavor to your preference.
- Add Eggs: Beat in the eggs one at a time, ensuring each egg is fully incorporated before adding the next. Scrape down the sides of the bowl to maintain even mixing.
- Assemble and Bake the Cheesecake: Pour the filling over the cooled crust, spreading evenly to the edges. Place the springform pan (still on the baking sheet) on the center rack of the oven. On the rack below, place a large baking dish filled with water to create a water bath, which helps bake the cheesecake gently and evenly.
- Bake Slowly: Bake for 70 to 90 minutes. The cheesecake is done when the edges are set but the center still slightly jiggles when gently shaken. Remove from oven and let it come to room temperature.
- Chill the Cheesecake: Run a sharp knife around the edges to loosen the cheesecake, then remove the sides of the springform pan. Cover the cheesecake with plastic wrap and refrigerate for at least 2 to 3 hours to set thoroughly.
- Prepare the Topping: In a clean bowl, beat the whipping cream, powdered sweetener, and vanilla or coconut extract until stiff peaks form.
- Add the Topping and Garnish: Spread the whipped cream evenly over the chilled cheesecake. Sprinkle the toasted large flaked coconut on top for garnish. To toast coconut flakes, heat a dry skillet over medium heat, add the flakes, and shake frequently until lightly browned and fragrant.
Notes
- You can substitute granular sweetener with your preferred keto-friendly sweetener such as erythritol or monk fruit.
- Ensure the cream cheese and eggs are at room temperature for optimal mixing and smooth texture.
- The water bath is essential to prevent cracking and achieve a creamy cheesecake filling.
- To toast coconut flakes, use a dry skillet over medium heat, stirring or shaking frequently to avoid burning.
- This cheesecake is best served chilled and can be stored covered in the refrigerator up to 4 days.
- Prep Time: 25 minutes
- Cook Time: 1 hour 30 minutes
- Category: Dessert
- Method: Baking
- Cuisine: Keto
Keywords: Keto cheesecake, coconut cheesecake, low carb dessert, keto dessert, creamy cheesecake, macadamia nut crust, sugar free cheesecake
