
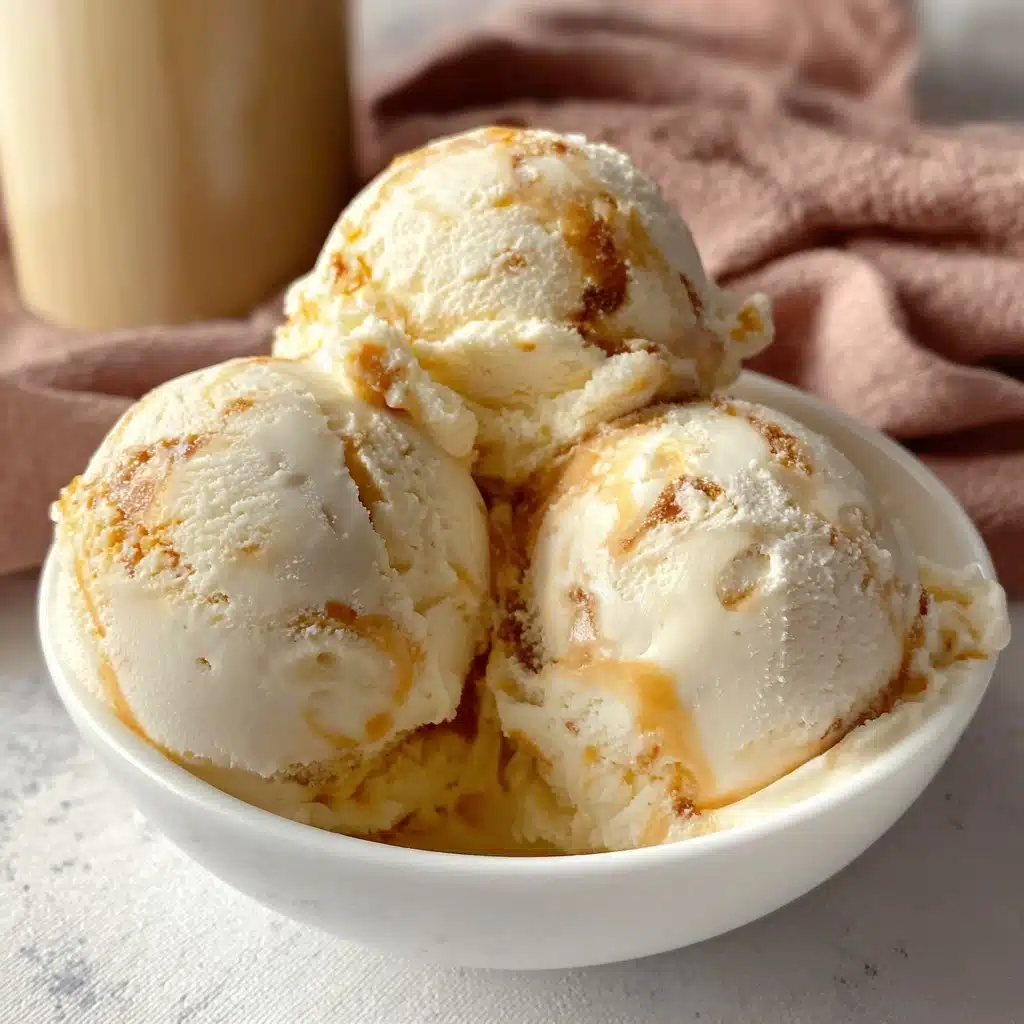
Homemade Honeycomb Ice Cream Recipe
If you’ve ever found yourself irresistibly drawn to that golden swirl of crunchy honeycomb in your favorite chocolate bar, imagine it mixed seamlessly into a creamy, dreamy ice cream you made yourself! Homemade Honeycomb Ice Cream is exactly that: a luscious fusion of rich, velvety ice cream and crisp, caramelized honeycomb nuggets. Every bite delivers a burst of toasty sweetness and melt-in-your-mouth texture that’s simply unforgettable. This recipe takes you step by step from bubbling golden syrup to a perfectly frozen, showstopper dessert. Trust me, once you taste your own batch, those supermarket versions will never have quite the same appeal again.

Ingredients You’ll Need
The beauty of Homemade Honeycomb Ice Cream lies in its simplicity: each ingredient plays a vital role, bringing out the best in flavor, texture, or that signature golden color. Let’s see what you’ll need for this treat.
- Golden syrup: This is the secret to that classic, caramel flavor in the honeycomb; don’t substitute with honey for this recipe!
- Caster sugar: Its fine crystals dissolve quickly, ensuring the honeycomb sets perfectly light and crisp.
- Bicarbonate of soda: The magical ingredient that brings the honeycomb’s iconic crunch and bubbles — don’t skip it.
- Double cream: It’s what gives your ice cream ultra-creamy richness and a soft, scoopable texture.
- Condensed milk: This adds indulgent sweetness while also preventing your ice cream from turning icy.
How to Make Homemade Honeycomb Ice Cream
Step 1: Prepare Your Tin
Start by lining a 23cm square baking tin or baking tray with non-stick baking paper. This step is crucial because the honeycomb mixture will be blistering hot — make sure your prepared tin is on a heatproof surface to avoid any accidents. Trust me, pre-preparation makes cleanup a breeze!
Step 2: Melt the Golden Syrup
Grab a large, deep saucepan (the honeycomb will bubble up dramatically) and pour the golden syrup in. Set it over a gentle heat for about one minute, just until the syrup loosens up and becomes gloriously runny. This helps ensure an even caramelization in the next step.
Step 3: Add Sugar and Boil
Add the caster sugar straight into the pan with your syrup. Swirl (but don’t stir) the pan gently to help the sugar dissolve evenly. Bring this mixture to a boil and set a timer for 3 minutes. Swirl gently every so often — this keeps the caramel from burning and gives you that beautiful golden color we’re after.
Step 4: Add Bicarbonate of Soda
Now comes the fun part! Take the pan off the heat and quickly stir in the bicarbonate of soda. Watch in amazement as your syrup immediately froths up and expands. Stir just enough to dissolve the powder, then pour it right into your lined tin. Remember, this mixture is fiercely hot, so work swiftly but carefully. Leave it completely untouched for at least an hour to set.
Step 5: Cool and Chop the Honeycomb
Once your honeycomb is solid and cooled, crack it into chunky, golden shards. Don’t worry if the pieces aren’t all the same — those irregular nuggets make the texture of Homemade Honeycomb Ice Cream extra enchanting.
Step 6: Line Your Ice Cream Tin
Line a 900g (2lb) loaf tin with cling film, leaving plenty to overhang the sides. This will help you unmold your gorgeous ice cream later, or simply make serving a bit easier.
Step 7: Whip the Cream
Pour the double cream into a large mixing bowl. Using an electric whisk, beat until you have dreamy soft peaks — the kind that gently tip over when you lift your whisk. This step is the base for that signature creamy mouthfeel.
Step 8: Add the Condensed Milk
Pour in your tin of condensed milk and whisk again until the mixture thickens up. This not only amplifies the ice cream’s richness, but also keeps the finished product gorgeously scoopable straight from the freezer.
Step 9: Fold in the Honeycomb
Add your homemade honeycomb pieces to the cream mixture, and gently fold in until the golden nuggets are evenly distributed. Be careful not to overmix — you want those lovely crunchy bits to hold their shape.
Step 10: Freeze
Spoon the mixture into your lined loaf tin and smooth the top with a spatula. Cover with the overhanging cling film and pop it into the freezer for at least six hours, or overnight for best results. The hardest part is waiting!
Step 11: Serve and Enjoy
When you’re ready to serve, take the tin out of the freezer and let it sit for five minutes. This makes scooping easier and helps the flavors shine through with every bite. Now dig in and savor your masterpiece!
How to Serve Homemade Honeycomb Ice Cream
Garnishes
Add a final flair by topping each scoop with extra honeycomb chunks, a drizzle of caramel sauce, or a sprinkle of chocolate shavings. Fresh mint leaves add a pop of color and a delicate aroma that complements the toffee notes beautifully.
Side Dishes
This treat shines all on its own, but if you’re feeling indulgent, pair it with warm brownies, homemade waffles, or crisp butter cookies. These sides add contrasting temperatures and textures for a truly special dessert moment.
Creative Ways to Present
Go beyond the classic scoop! Consider layering the ice cream with crushed honeycomb in parfait glasses, serving it sandwich-style between two chocolate chip cookies, or even blending leftover chunks into a decadent milkshake. Not only do these ideas look stunning, but they make Homemade Honeycomb Ice Cream the star of any occasion.
Make Ahead and Storage
Storing Leftovers
Any leftovers (if you’re lucky enough to have them!) should be kept tightly wrapped in the freezer. Press cling film directly onto the ice cream’s surface to prevent ice crystals and keep everything fresh for up to two weeks.
Freezing
Homemade Honeycomb Ice Cream is happiest at a steady, cold temperature. Place the loaf tin toward the back of your freezer, where it’s coldest, to preserve its creamy texture and crunchy honeycomb nuggets. Avoid frequent thawing and refreezing, as it compromises the honeycomb’s delightful crunch.
Reheating
Unlike baked treats, ice cream doesn’t need reheating. Simply let it soften on the counter for five to ten minutes before scooping. This step brings out all the complex flavors and silky texture you worked so hard to create!
FAQs
Can I make honeycomb without golden syrup?
Golden syrup is ideal for that classic flavor and golden hue, but if you’re in a pinch, light corn syrup is a workable (though slightly less flavorful) substitute. Avoid honey or maple syrup, as they react differently and can produce a sticky, chewy honeycomb.
How do I prevent the honeycomb from sticking to the baking paper?
Non-stick baking paper is your friend here! If you don’t have it, lightly greasing regular baking paper with a neutral oil will help. Just keep in mind that honeycomb is very hot initially, so be careful when handling.
Why did my honeycomb collapse or turn chewy?
This usually happens if the sugar wasn’t heated enough or if you overmixed after adding the bicarbonate of soda. For perfect results, cook the syrup for the full three minutes and stir the bicarbonate swiftly but just until dissolved.
Is there a way to keep honeycomb crunchy in the ice cream?
Coating your chopped honeycomb pieces lightly with a dusting of icing sugar before folding into the mixture helps repel moisture, preserving that addictive crunch even after freezing.
Can I use a different type of cream for this recipe?
Double cream is best for Homemade Honeycomb Ice Cream because its high fat content creates a smooth, rich base without the need for churning. Single cream or half-and-half doesn’t provide the same luxurious texture, so stick with double cream if possible.
Final Thoughts
I can’t tell you how much joy it brings to share a batch of Homemade Honeycomb Ice Cream with friends and family — it never fails to spark smiles and magical, golden memories. Give it a try, play around with your own twists, and watch as this indulgent creation becomes your signature treat, too. Happy scooping!
Print
Homemade Honeycomb Ice Cream Recipe
- Total Time: 6 hours 30 minutes
- Yield: 1 loaf tin 1x
- Diet: Vegetarian
Description
Indulge in the creamy sweetness of Homemade Honeycomb Ice Cream. This delightful treat combines the rich flavors of golden syrup, condensed milk, and homemade honeycomb for a decadent dessert experience.
Ingredients
Honeycomb:
- 2 tbsp golden syrup
- 140 g caster sugar
- 1 tsp bicarbonate of soda
Ice Cream Base:
- 600 ml double cream
- 1 x 397g tin condensed milk
Instructions
- Prepare Honeycomb: Line a baking tin with non-stick paper. Heat golden syrup, add sugar, boil, stir in bicarbonate of soda, pour into tin, and let set.
- Make Ice Cream: Whisk cream to soft peaks, add condensed milk, fold in honeycomb pieces, pour into tin, freeze for 6 hours.
- Serve: Remove from freezer 5 minutes before serving. Enjoy!
- Prep Time: 20 minutes
- Cook Time: 10 minutes
- Category: Dessert
- Method: Freezing
- Cuisine: Global
Nutrition
- Serving Size: 1 serving
- Calories: 320 kcal
- Sugar: 26g
- Sodium: 80mg
- Fat: 22g
- Saturated Fat: 14g
- Unsaturated Fat: 6g
- Trans Fat: 0g
- Carbohydrates: 30g
- Fiber: 0g
- Protein: 3g
- Cholesterol: 80mg
Keywords: Homemade Honeycomb Ice Cream, Ice Cream Recipe, Dessert Recipe, Honeycomb Dessert
