
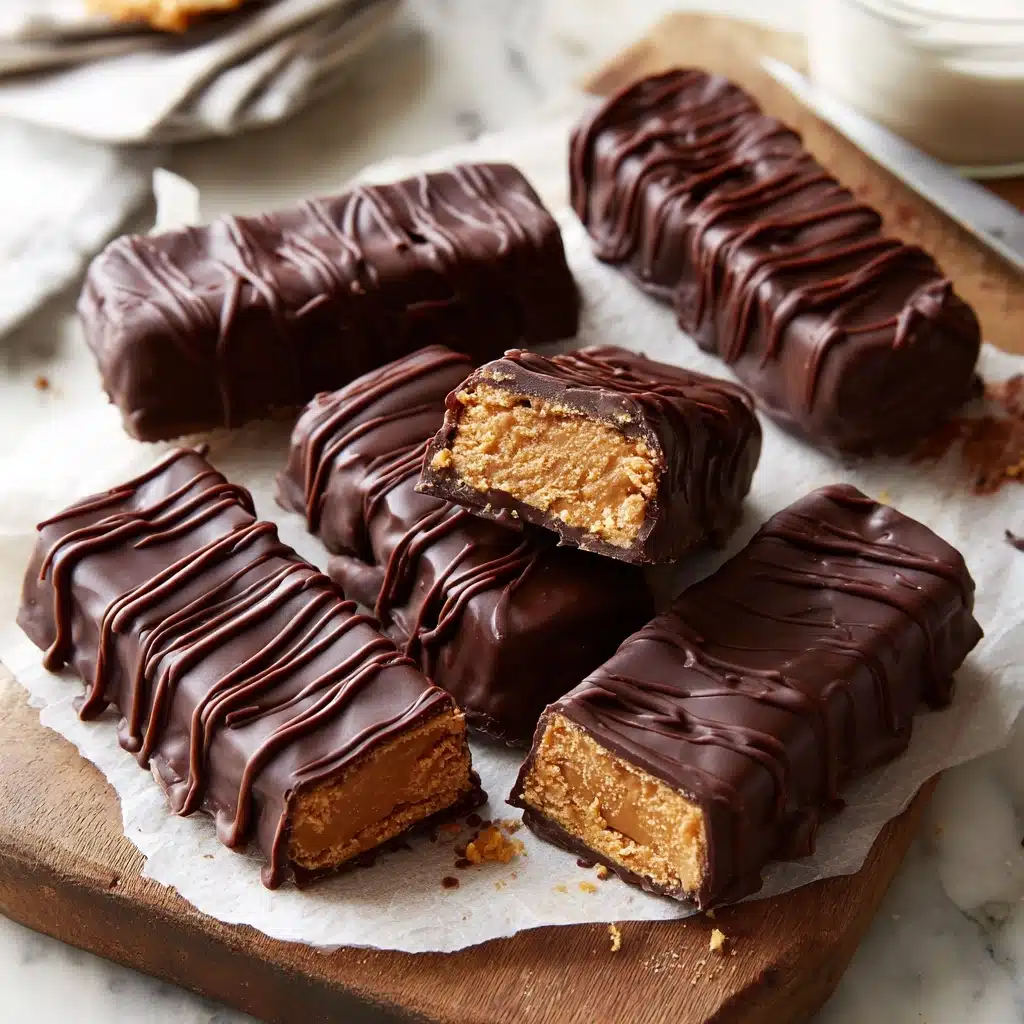
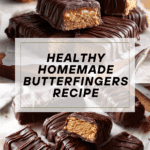
Healthy Homemade Butterfingers Recipe
What if I told you that you could satisfy your candy cravings and feel good about every single bite? Allow me to introduce you to my absolute favorite guilt-free treat: Healthy Homemade Butterfingers! With just a handful of nourishing, everyday ingredients, you can whip up a batch of these crispy, chocolate-coated bars in your own kitchen—no preservatives, no artificial anything. Sweet, salty, shatteringly crisp, and covered in a blanket of luscious chocolate, Healthy Homemade Butterfingers are the ultimate better-for-you candy that delivers pure joy with each crunch.

Ingredients You’ll Need
Building Healthy Homemade Butterfingers is all about smart choices and simple swaps that keep the flavor, texture, and fun of the classic treat. Each ingredient plays a vital role, and together, they create the magic you crave without the extra stuff you don’t!
- Peanut Butter: Creamy peanut butter brings rich, nutty flavor and that classic Butterfinger taste—natural is best for pure peanut goodness.
- Honey: Natural sweetness and sticky texture to bind everything together while adding lovely floral notes.
- Vanilla Extract: Adds warmth and depth, rounding out the peanut and honey flavors so your bars taste totally homemade.
- Sea Salt: Balances all the sweetness and enhances every flavor in these bars—don’t skip it!
- Cornflake Cereal: The crunchy secret weapon! Cornflakes give that signature crispy snap we all adore.
- Chocolate Chips: A dreamy layer of melt-in-your-mouth chocolate—dairy free if you like, for everyone to enjoy.
- Coconut Oil: Ensures your chocolate melts like a dream and sets up with a shiny, irresistible finish.
How to Make Healthy Homemade Butterfingers
Step 1: Warm the Peanut Butter Mixture
Start by combining your peanut butter, honey, vanilla extract, and sea salt in a saucepan over medium-low heat. Stir gently until everything is smooth, glossy, and totally blended—this takes just a few minutes, but it makes all the difference in turning your ingredients into the perfect sticky base for Healthy Homemade Butterfingers!
Step 2: Mix with Cornflakes
Pour the warm peanut butter mixture into a large mixing bowl filled with your cornflake cereal. Use a sturdy spatula or spoon to stir and crush the cereal gently as you go—it’s okay if the flakes break up a bit! This helps every bit get thoroughly coated for even crunch in every bite.
Step 3: Shape Into Bars and Freeze
Scoop out portions of the mixture and form them into neat little logs—aim for about 12 to 14 bars total. Place each formed Butterfinger on a parchment-lined plate or baking sheet. Pop them in the freezer for about an hour so they firm up nicely and are easy to handle for dipping later.
Step 4: Melt the Chocolate
While your bars are chilling, melt the chocolate chips and coconut oil together. You can do this in short bursts in the microwave, stirring between each, or gently on the stove. The coconut oil helps the chocolate stay silky and gives the finished coating a glossy finish—just watch it closely so it doesn’t burn.
Step 5: Coat and Chill
Let the fun begin! Dip each frozen log into the melted chocolate, letting the excess drip away before placing it back on the lined plate. Once all your Healthy Homemade Butterfingers are coated, return them to the freezer for about 10 more minutes until the chocolate is perfectly set and ready to crack when you bite in!
How to Serve Healthy Homemade Butterfingers
Garnishes
Dress up your Healthy Homemade Butterfingers by drizzling a little extra melted chocolate on top, or sprinkle with a pinch of flaky sea salt for a fancy finish. A dusting of finely chopped roasted peanuts also adds a lovely crunch and looks eye-catching on a party tray.
Side Dishes
Keep things light and refreshing with sides like mixed berries, sliced apples, or even a tropical fruit salad—these sweet, tart flavors pair beautifully with the rich, peanutty crunch of your bars. If you love contrasts, serve your Butterfingers alongside a cool glass of almond or oat milk for a nostalgic candy-and-milk treat!
Creative Ways to Present
Get playful! Wrap each Butterfinger in parchment and tie with baker’s twine for adorable, giftable treats. Arrange them on a colorful platter for movie nights, or tuck one in a lunchbox for a midday surprise. You could even crumble a few bars over a big bowl of vanilla frozen yogurt for the world’s best homemade sundae.
Make Ahead and Storage
Storing Leftovers
Stash leftovers in an airtight container in the refrigerator, where they’ll keep perfectly for up to a week. The cool temp keeps the chocolate firm and the insides crisp—just pull one out whenever a craving strikes.
Freezing
Healthy Homemade Butterfingers freeze like a dream! Layer them between sheets of parchment in a freezer-safe container. They’ll stay fresh and fabulous for up to three months. Frozen Butterfingers make the best grab-and-go snack or impromptu dessert.
Reheating
You don’t ever need to reheat, but if you’d like your bars a bit softer, leave one at room temperature for about 10 minutes before enjoying. Avoid microwaving, as it can melt the chocolate and ruin the crisp texture.
FAQs
Can I use a different nut butter?
Absolutely! Almond butter or sunflower seed butter work well as substitutes, but keep in mind that peanut butter delivers the most authentic classic Butterfinger flavor in these Healthy Homemade Butterfingers.
What can I use instead of honey?
Maple syrup or brown rice syrup are great alternatives for binding and sweetness. Just note: maple syrup will slightly change the flavor, but your bars will still be absolutely delicious!
Are these gluten-free?
As long as you use certified gluten-free cornflakes and chocolate chips, your Healthy Homemade Butterfingers are totally gluten-free, so everyone can indulge!
How do I get the best crunch?
Make sure to crush the cornflakes only slightly—they should stay mostly in pieces to lock in that signature crispy texture. Freezing the bars before dipping helps them hold their shape and keeps the outside nice and crisp.
Can kids help with this recipe?
Definitely! Kids can shape the bars and dip them in chocolate (with a little supervision), making Healthy Homemade Butterfingers a fantastic family kitchen project.
Final Thoughts
If you’re looking for a treat that balances nostalgic joy with wholesome ingredients, Healthy Homemade Butterfingers are simply unbeatable. Give this recipe a go, share with loved ones, and I promise—it’ll become a crunchy, chocolatey staple in your homemade snack rotation!
Print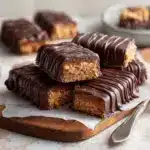
Healthy Homemade Butterfingers Recipe
- Total Time: 1 hour 25 minutes
- Yield: 12–14 bars 1x
- Diet: Vegetarian
Description
Enjoy the delicious taste of homemade Butterfingers with this healthier version that you can easily make at home. These bars are perfect for satisfying your sweet cravings while still being mindful of your ingredients.
Ingredients
Peanut Butter Mixture:
- 1 cup peanut butter
- 1/3 cup honey
- 1/2 tsp vanilla extract
- 1/2 tsp sea salt
Additional Ingredients:
- 1 + 3/4 cup cornflake cereal
- 1 cup chocolate chips (dairy-free, if needed)
- 1 tsp coconut oil
Instructions
- Heat Peanut Butter Mixture: In a saucepan over medium-low heat, combine peanut butter, honey, vanilla extract, and sea salt. Heat for 2-4 minutes until smooth.
- Mix Ingredients: Transfer the peanut butter mixture to a large mixing bowl. Add the cornflake cereal. Stir well to combine, ensuring the cereal is coated.
- Shape Logs: Shape the mixture into 12-14 logs. Place them on a parchment-lined plate or baking sheet and freeze for 1 hour.
- Melt Chocolate: Melt the chocolate chips and coconut oil in a microwave or on the stove until smooth.
- Dip Bars: Dip each peanut butter log into the melted chocolate, allowing excess to drip off. Place them back on the lined plate and freeze until the chocolate sets, approximately 10 minutes.
- Storage: Store your homemade Butterfingers in the refrigerator or freezer.
Notes
- You can customize this recipe by adding chopped nuts or seeds to the mixture for extra crunch.
- For a sweeter version, you can use milk chocolate chips instead of dark chocolate.
- Prep Time: 15 minutes
- Cook Time: 10 minutes
- Category: Dessert
- Method: Mixing, Freezing
- Cuisine: American
Nutrition
- Serving Size: 1 bar
- Calories: 180
- Sugar: 12g
- Sodium: 120mg
- Fat: 11g
- Saturated Fat: 4g
- Unsaturated Fat: 6g
- Trans Fat: 0g
- Carbohydrates: 17g
- Fiber: 2g
- Protein: 4g
- Cholesterol: 0mg
Keywords: Homemade Butterfingers, Healthy Candy Bars, DIY Butterfinger Recipe
