
Baked cheese buns Recipe
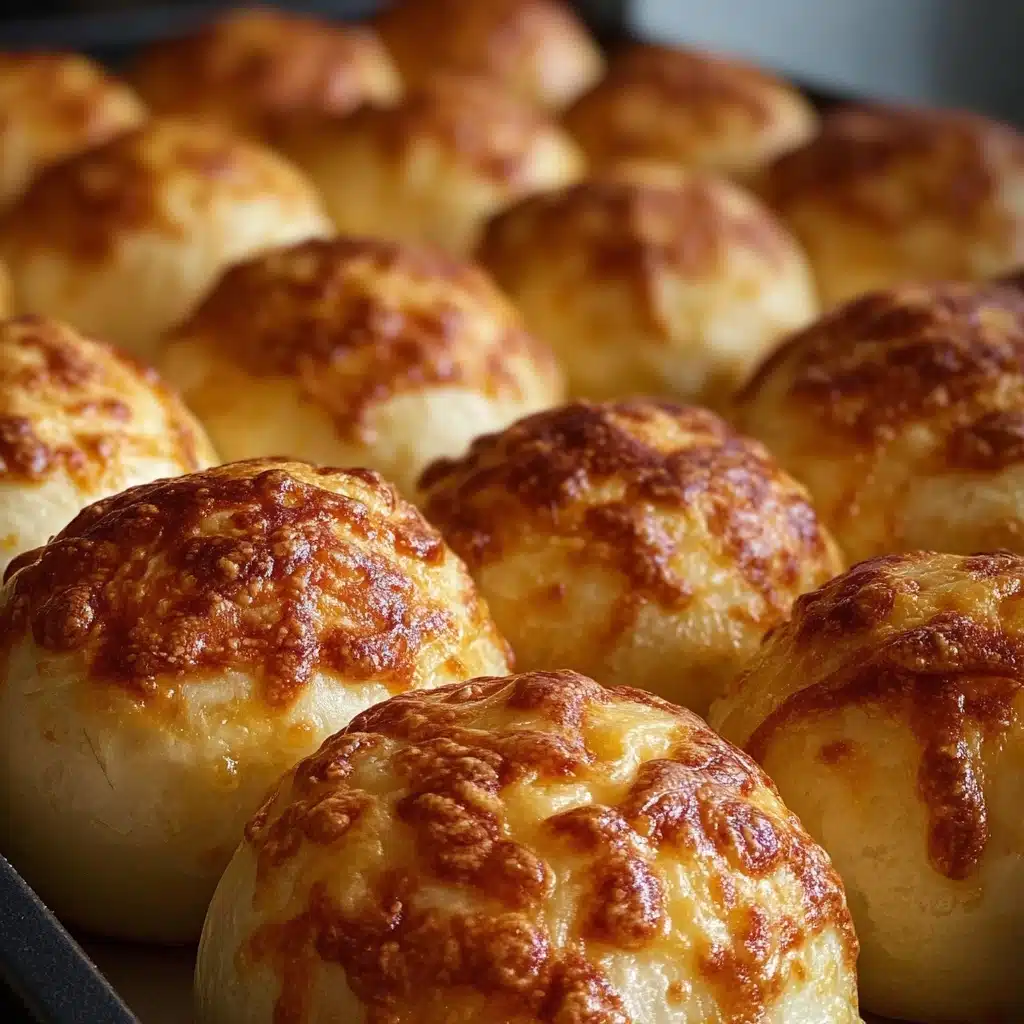
Imagine a fresh batch of golden, pillowy-soft Baked cheese buns filling your kitchen with a toasty aroma and promising a gooey cheese pull with every bite. This recipe is a true comfort food classic, combining the irresistible goodness of homemade bread with oozy melted cheese at the center. Whether you’re baking them for a weekend brunch, as a snack for friends, or simply treating yourself, these buns are destined to become a staple in your kitchen. Get ready to fall head-over-heels for their fluffy texture and cheesy, heartwarming center!

Ingredients You’ll Need
This recipe uses simple, everyday ingredients, each chosen to create the fluffiest, most irresistible baked cheese buns imaginable. Together, they strike the perfect balance of rich flavor, soft crumb, and an unforgettably cheesy surprise inside every roll.
- 1 cup warm milk (110°F): Helps activate the yeast and creates a moist, tender dough.
- 2 1/4 tsp active dry yeast: Responsible for the rise; make sure it’s fresh and bubbly for the fluffiest buns.
- 1 tbsp sugar: Feeds the yeast and adds a touch of sweetness to balance the savory cheese.
- 3 cups all-purpose flour: The backbone of the dough, creating structure and softness.
- 1 tsp salt: Enhances all the flavors and keeps the dough deliciously balanced.
- 4 tbsp unsalted butter, melted: Adds richness and a buttery note to every bite.
- 1 large egg: Gives extra lift and a tender crumb to the buns.
- 2 cups grated cheese (such as mozzarella, cheddar, or a combination): The cheesy heart of each bun—choose your favorites for a fun flavor twist.
How to Make Baked cheese buns
Step 1: Activate the Yeast
Start by pouring the warm milk into a small bowl, then sprinkle in your sugar and active dry yeast. Give it a gentle stir and let it sit for 5 to 10 minutes. You’ll know the yeast is ready when it turns foamy and bubbly across the surface—this is your ticket to light, airy baked cheese buns!
Step 2: Mix Up the Dough
In a large bowl, whisk together the flour and salt. Create a little well in the center, then pour in your frothy yeast mix, melted butter, and egg. Gently stir everything together until it forms a shaggy, sticky dough.
Step 3: Knead for Softness
Transfer the dough to a lightly floured surface and knead with your hands for about 8 to 10 minutes. You’ll notice the dough go from sticky to smooth and elastic—once it bounces back a little when you poke it, you’re ready for the next step.
Step 4: First Rise
Move the dough to a greased bowl, cover it with a clean cloth or plastic wrap, and let it rise somewhere warm for about an hour. It should double in size and look beautifully fluffy.
Step 5: Shape and Stuff
Punch down the risen dough to release the air, then portion it into 12 even pieces. Flatten each piece gently in your hand, add a generous tablespoon of grated cheese in the middle, and pinch the dough closed to seal in the cheesy goodness. Roll them into smooth balls for that classic look.
Step 6: Second Rise
Line a baking sheet with parchment, arrange your buns a couple inches apart, and cover them loosely. Let them rise again for 30 minutes—they’ll puff up and get perfectly ready for baking.
Step 7: Preheat and Prepare
While the buns are rising, preheat your oven to 375°F (190°C). For a bakery-style golden top, brush each bun with a little milk or a beaten egg just before they go in the oven.
Step 8: Bake to Perfection
Slide the tray into your hot oven and bake for 15 to 20 minutes. Watch as the buns turn rich golden-brown and the scent of fresh bread and melted cheese fills your kitchen. If you peek, you might even see a hint of cheese bubbling out—pure magic!
Step 9: Cool Slightly and Savor
Let your baked cheese buns cool for just a few minutes before tearing into them. This allows the cheese to set to gooey perfection, so you’ll still get that melt but avoid any molten spills.
How to Serve Baked cheese buns
Garnishes
For an extra-special touch, brush the tops with a little melted butter and sprinkle with chopped fresh herbs like parsley, chives, or even a dash of flaky sea salt as soon as they come out of the oven. These little additions perfectly highlight the flavors of the baked cheese buns and make them even more inviting.
Side Dishes
Baked cheese buns shine next to a bowl of tomato soup for classic comfort, or as a savory companion to a crisp side salad with vinaigrette. They’re also fantastic alongside cured meats, olives, and pickled veggies, turning a casual meal into a true feast.
Creative Ways to Present
Try presenting baked cheese buns in a breadbasket lined with a colorful napkin for family gatherings, or stack them tower-style on a platter for parties. For smaller bites, make mini versions and serve as a cheese-filled surprise at brunch buffets or picnics—everyone will reach for seconds!
Make Ahead and Storage
Storing Leftovers
Leftover baked cheese buns can be kept in an airtight container at room temperature for up to 2 days. If you want to keep them fresher, store them in the fridge—they’ll stay soft and cheesy for about 4 days. Just be sure they’re fully cooled before packing them up so they don’t turn soggy.
Freezing
If you love to have fresh-baked rolls on hand, these buns freeze wonderfully! Once completely cooled, pop them into a freezer bag or container, separating layers with parchment paper. They’ll keep their taste and texture for up to 2 months—just thaw overnight in the fridge before reheating.
Reheating
To revive the freshness of baked cheese buns, warm them in a 300°F (150°C) oven for about 8 minutes, or just until heated through. The cheese in the center will melt beautifully, giving you that glorious gooey pull all over again. A quick zap in the microwave also works for a softer bun, but the oven will restore that slightly crisp crust.
FAQs
Can I use different types of cheese inside the buns?
Absolutely! This recipe works with nearly any melty cheese—mozzarella, cheddar, Swiss, provolone, or even a spicy pepper jack. Feel free to mix and match for a more complex flavor or use what you already have on hand.
What if I don’t have active dry yeast?
If you only have instant yeast, you can use it as a direct substitute in this recipe. There’s no need to activate it in warm milk first—just mix it in with the flour for an equally fluffy result.
Can I make the dough ahead of time?
Yes, you can make the dough a day ahead and let it rise in the refrigerator overnight. This slower rise can actually enhance the flavor, and your baked cheese buns will taste even richer the next day!
How can I make these buns gluten-free?
If you want a gluten-free version, try replacing the all-purpose flour with a cup-for-cup gluten-free baking blend that includes xanthan gum. The dough will be a bit stickier, but just dust your hands with extra blend to make shaping easier.
What’s the best way to keep the cheese from leaking out?
Be sure to seal the dough tightly around the cheese, pinching all the seams well at the bottom of each bun. Chilling the cheese before stuffing or using a slightly firmer variety can also help keep things tidy during baking.
Final Thoughts
Homemade baked cheese buns are a true treat worth sharing—and once you taste their soft bread and melty center, you’ll want to make them on repeat. Don’t be surprised if they become your new go-to for family meals, picnics, or anytime you crave a little warm, cheesy comfort. Give them a try and watch everyone’s faces light up as they pull apart these fluffy, golden beauties!
Print
Baked cheese buns Recipe
- Total Time: 2 hours
- Yield: 12 buns 1x
- Diet: Vegetarian
Description
These delicious baked cheese buns are a delightful treat for cheese lovers. Soft, fluffy buns filled with gooey melted cheese make for a perfect snack or accompaniment to any meal.
Ingredients
Dough:
- 1 cup warm milk (110°F)
- 2 1/4 tsp active dry yeast
- 1 tbsp sugar
- 3 cups all-purpose flour
- 1 tsp salt
- 4 tbsp unsalted butter, melted
- 1 large egg
Filling:
- 2 cups grated cheese (such as mozzarella, cheddar, or a combination)
Instructions
- Prepare the Yeast Mixture: In a bowl, combine the warm milk, sugar, and active dry yeast. Allow it to sit for about 5-10 minutes until it becomes frothy.
- Mix the Dough: In a large mixing bowl, combine the flour and salt. Make a well in the center and pour in the yeast mixture, melted butter, and the egg. Mix until a dough forms.
- Knead the Dough: Knead the dough on a floured surface for about 8-10 minutes, until it is smooth and elastic.
- Let the Dough Rise: Place the dough in a greased bowl, cover it with a clean cloth, and let it rise in a warm place for about 1 hour, or until doubled in size.
- Shape the Buns: Once the dough has risen, punch it down and divide it into 12 equal pieces. Flatten each piece slightly, place a tablespoon of grated cheese in the center, and fold the dough around it to form a bun.
- Final Rise and Bake: Place the buns on a baking sheet lined with parchment paper, cover, and let them rise for another 30 minutes. Preheat your oven to 375°F (190°C). Brush the tops of the buns with a bit of milk or beaten egg for a nice golden finish. Bake in the preheated oven for 15-20 minutes, or until the buns are golden brown and the cheese is oozing out.
- Serve: Allow to cool slightly before serving, to enjoy them at their melty best.
Notes
- You can experiment with different types of cheese for varying flavors.
- These buns are best enjoyed fresh but can be stored in an airtight container and reheated.
- Prep Time: 20 minutes
- Cook Time: 20 minutes
- Category: Bread
- Method: Baking
- Cuisine: Global
Nutrition
- Serving Size: 1 bun
- Calories: 240
- Sugar: 2g
- Sodium: 380mg
- Fat: 10g
- Saturated Fat: 6g
- Unsaturated Fat: 3g
- Trans Fat: 0g
- Carbohydrates: 30g
- Fiber: 1g
- Protein: 8g
- Cholesterol: 45mg
Keywords: cheese buns, baked buns, cheese-filled buns


