
Crispy Chicken Thighs with Sake Butter Sauce and Salsa Macha Recipe
Introduction
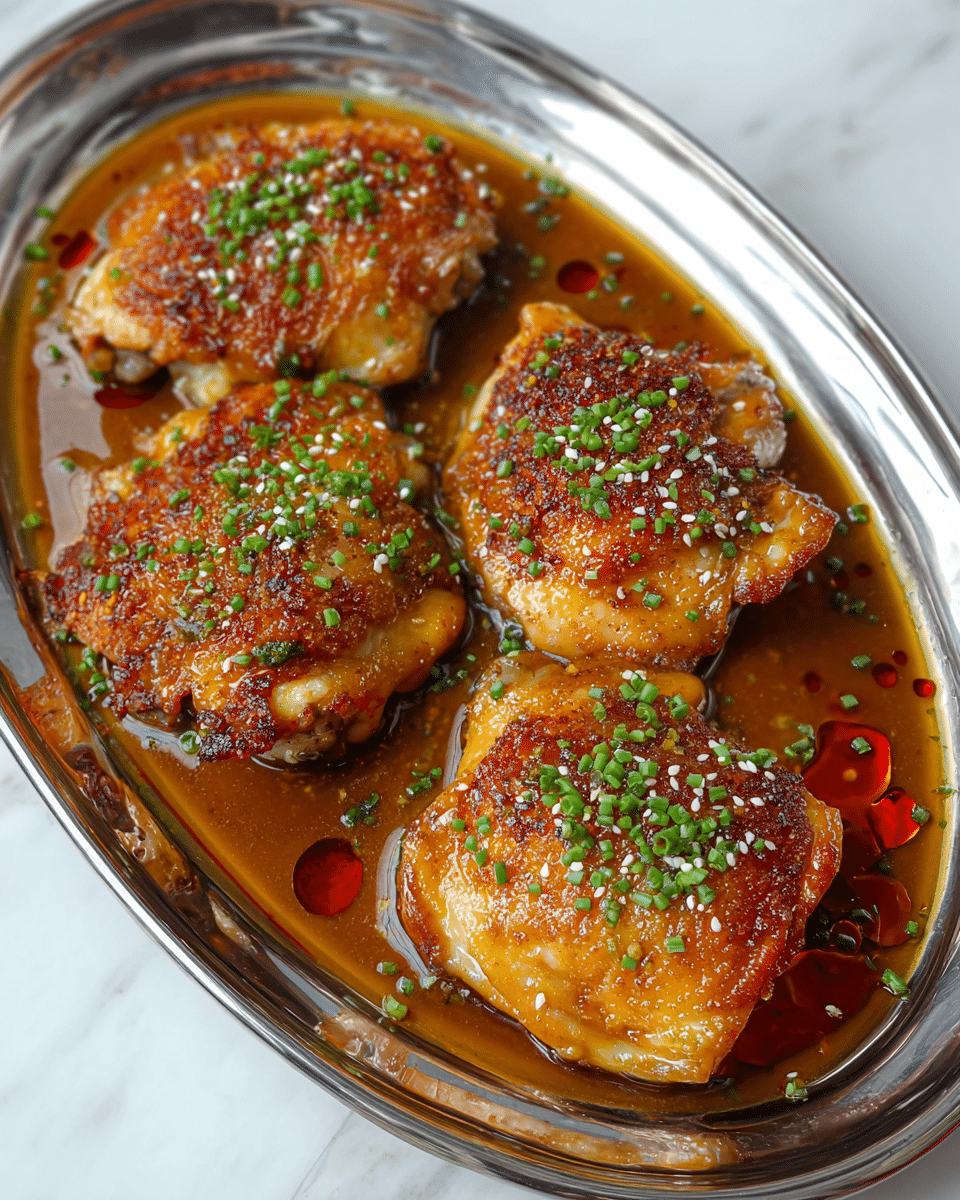
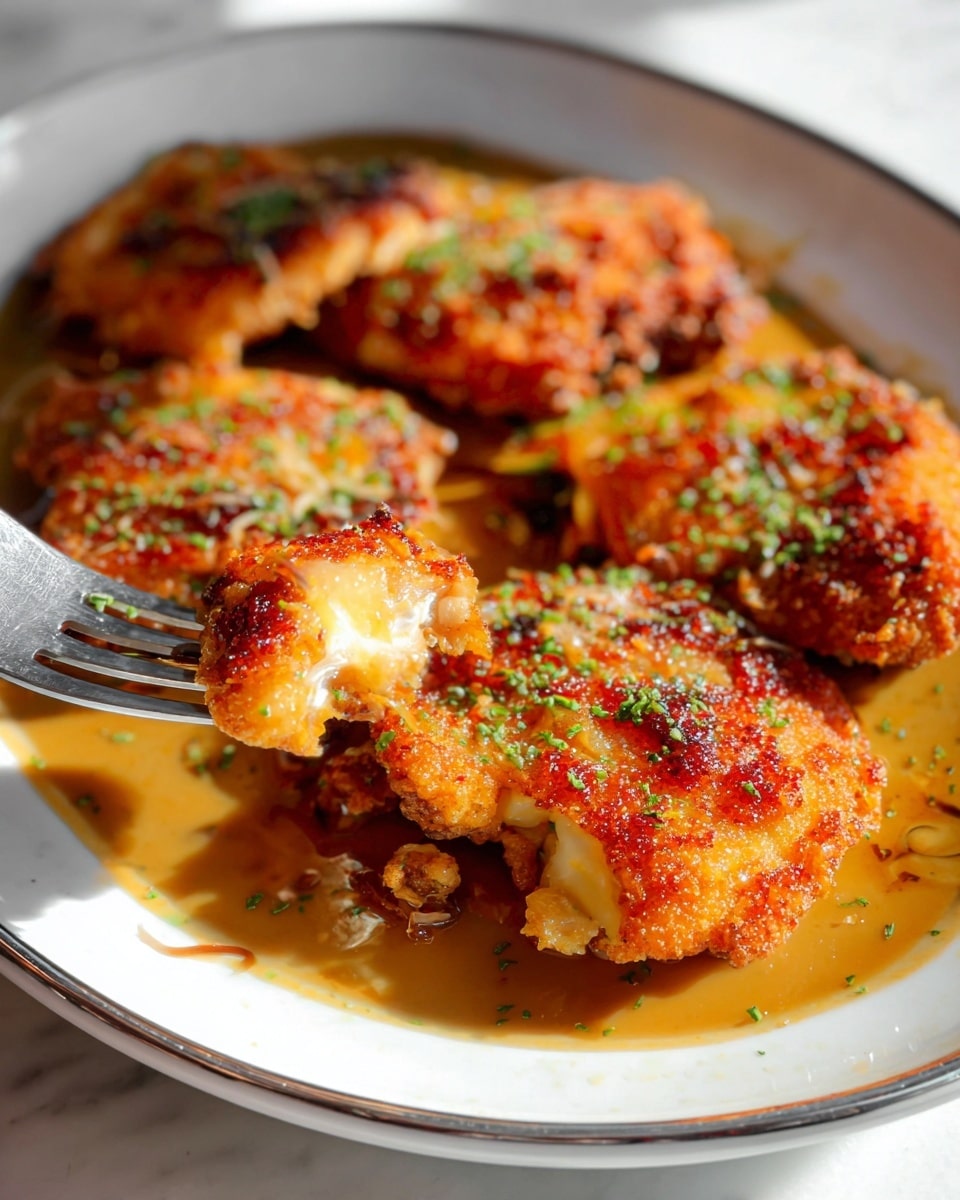
Experience the perfect combination of crispy skin and tender meat with these Crispy Chicken Thighs served alongside a rich and flavorful sake butter sauce. This dish offers a delightful balance of textures and savory notes that will impress your family and friends.
Ingredients
- 4 chicken thighs (skin on, boneless)
- Kosher salt (for brining)
- 1 drizzle olive oil
- 1 shallot (brunoise)
- ½ cup sake
- 2 tbsp rice vinegar
- 2 tsp soy sauce (or tamari)
- 1 tsp agave nectar
- 6-7 tbsp unsalted butter (cold and cubed)
- Salsa macha (to taste)
- Chives (chopped, to taste)
Instructions
- Step 1: Place the chicken thighs on a cooling rack set over a sheet pan. Sprinkle liberally with kosher salt on both sides. Refrigerate uncovered for at least 1 hour and up to 4 hours. Remove from the fridge about 30 minutes before cooking to come to room temperature.
- Step 2: Pat the chicken thoroughly dry. Drizzle a little olive oil over the skin.
- Step 3: Place the chicken skin side down in a cold stainless steel pan. Turn the heat to medium-high for 2 minutes, then reduce to low or medium-low, adjusting based on your stove’s strength. Let the fat render and skin crisp for about 20-25 minutes. Around 10 minutes in, gently slide a spatula under the skin to help release it and promote even crisping. Baste the chicken with the rendered fat occasionally to speed cooking.
- Step 4: When the skin is golden and crispy, increase the heat to medium-high and flip the chicken. Cook for another 5-10 minutes until the internal temperature reaches 175-180°F and the meat is fully cooked.
- Step 5: Remove the chicken from the pan and set aside. Add the shallots, sake, and rice vinegar to the pan. Cook over medium heat until the liquid reduces by half.
- Step 6: Stir in the soy sauce and agave nectar, cooking for another minute. Turn off the heat, then add the cold cubed butter. Whisk vigorously to emulsify the sauce.
- Step 7: To serve, spoon the sake butter sauce onto the plate first to keep the skin crispy, then top the chicken with salsa macha and chopped chives. Enjoy!
Tips & Variations
- For even crispier skin, ensure the chicken is completely dry before cooking and avoid crowding the pan.
- Substitute sake with dry white wine if unavailable.
- Add a squeeze of lemon juice to the sauce for a bright, tangy contrast.
- Use tamari instead of soy sauce for a gluten-free option.
Storage
Store leftover chicken and sauce separately in airtight containers in the refrigerator for up to 3 days. Reheat chicken gently in a skillet over low heat to maintain crispiness. Warm the sauce slowly on the stove, whisking to recombine before serving.
How to Serve
Serve this delicious recipe with your favorite sides.
FAQs
Can I use bone-in chicken thighs for this recipe?
Yes, you can use bone-in chicken thighs, but cooking time will be longer. Adjust the heat and cook until the internal temperature reaches 175-180°F to ensure the meat is fully done.
What if I don’t have salsa macha?
If salsa macha isn’t available, you can substitute with a spicy chili oil or a sprinkle of red pepper flakes to add heat and depth to the dish.
Print
Crispy Chicken Thighs with Sake Butter Sauce and Salsa Macha Recipe
- Total Time: 1 hour 40 minutes (including brining)
- Yield: 4 servings 1x
Description
This recipe features crispy, juicy chicken thighs cooked to perfection on the stovetop, finished with a rich, savory sake butter sauce enhanced by shallots, soy, and a touch of sweetness. Topped with smoky salsa macha and fresh chives, it delivers a harmonious balance of textures and flavors perfect for a flavorful, elegant meal.
Ingredients
Chicken
- 4 chicken thighs (skin on, boneless)
- Kosher salt (for brining)
- 1 drizzle olive oil
Sake Butter Sauce
- 1 shallot (brunoise)
- ½ cup sake
- 2 tbsp rice vinegar
- 2 tsp soy sauce (or tamari)
- 1 tsp agave nectar
- 6–7 tbsp unsalted butter (cold and cubed)
Toppings
- Salsa macha (to taste)
- Chives (chopped, to taste)
Instructions
- Brine the chicken: Place the chicken thighs on a cooling rack over a sheet pan. Liberally sprinkle kosher salt on both sides of the chicken. Refrigerate uncovered for at least 1 hour, up to 4 hours. Remove from fridge about 30 minutes before cooking to come to room temperature.
- Prep the chicken for cooking: Pat the chicken thighs dry thoroughly with paper towels. Drizzle a little olive oil over the skin side to help with crisping.
- Crisp the chicken skin: Place the chicken skin side down on a cold stainless steel pan, then turn the heat to medium-high for 2 minutes. Lower the heat to low or medium-low depending on your stove. Cook for about 20-25 minutes, allowing the fat to render and the skin to crisp fully. Around 10 minutes in, gently slide a spatula under the skin to help it release and crisp evenly. Baste the chicken occasionally with the rendered fat to speed cooking and enhance flavor.
- Finish cooking the chicken: When the skin is perfectly golden and crispy, increase heat back to medium-high and flip the chicken. Cook the other side for 5-10 minutes until the internal temperature reaches 175-180°F (79-82°C).
- Make the sake butter sauce: Remove the chicken from the pan. Add the diced shallot, sake, and rice vinegar to the pan. Simmer at medium heat until the liquid reduces by half. Stir in soy sauce and agave nectar, cooking for an additional minute.
- Finish the sauce: Turn off the heat and whisk in the cold, cubed butter vigorously until the sauce is emulsified and silky.
- Plate and serve: Pour the sauce on the plate first to preserve the crispiness of the chicken skin. Top the chicken with salsa macha and chopped chives according to taste. Serve immediately and enjoy!
Notes
- Brining dry in the fridge helps achieve ultra crispy skin by drying out the surface.
- Patting the chicken dry is crucial before cooking to ensure maximum crispiness.
- Using a cold pan at the start allows the fat to render slowly, producing crisper skin without burning.
- Adjust the salsa macha quantity to control heat and smoky flavor intensity.
- Monitor internal temperature with a probe thermometer for perfectly cooked thighs.
- If sake is unavailable, a dry white wine can be substituted but will alter flavor slightly.
- Prep Time: 10 minutes plus 1-4 hours brining
- Cook Time: 30-40 minutes
- Category: Main Dish
- Method: Stovetop
- Cuisine: Japanese Fusion
Keywords: crispy chicken thighs, sake butter sauce, Japanese inspired chicken, skillet chicken, pan seared chicken thighs, salsa macha chicken, savory butter sauce


