
Mini Chocolate Cakes with Marshmallow Filling and Chocolate Coating Recipe
Introduction
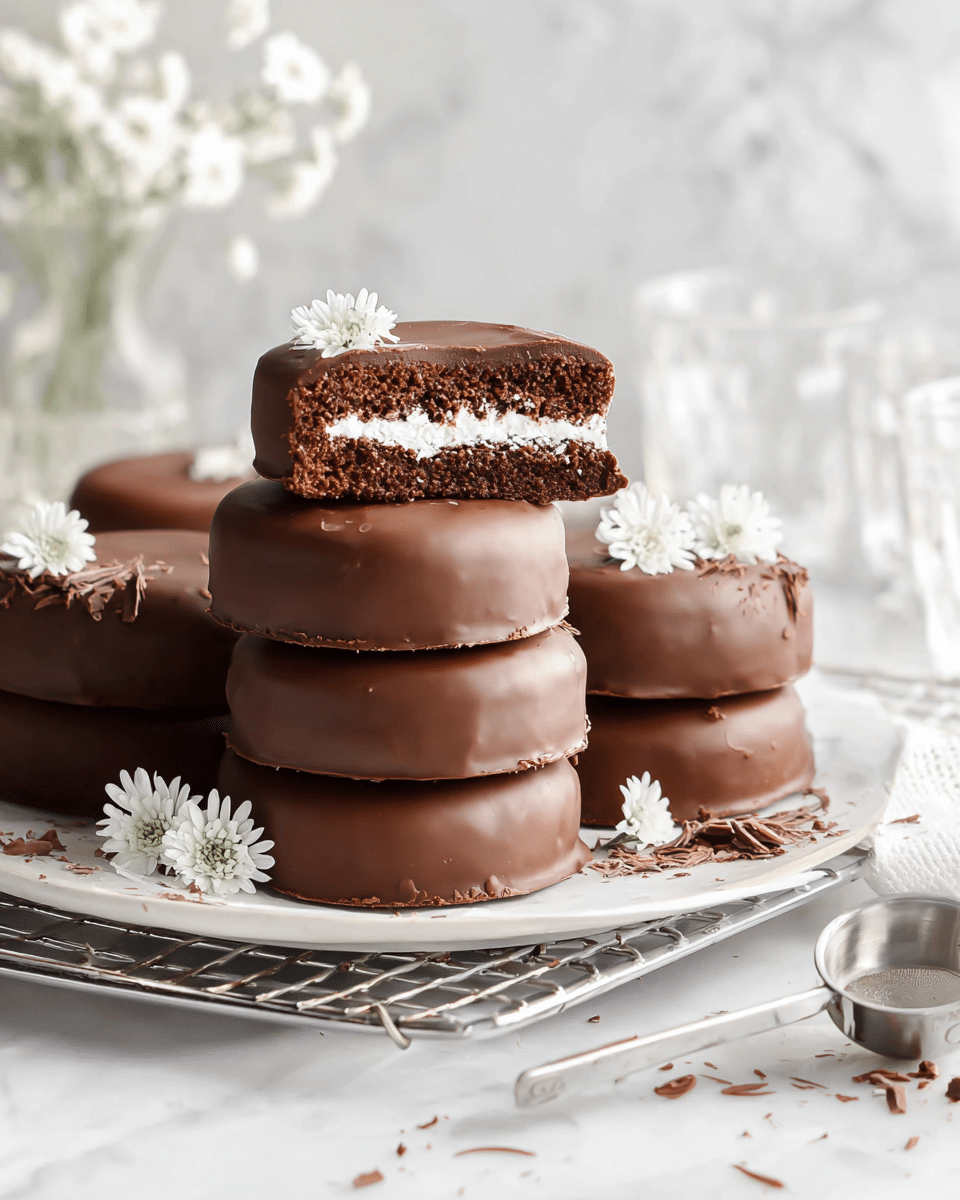
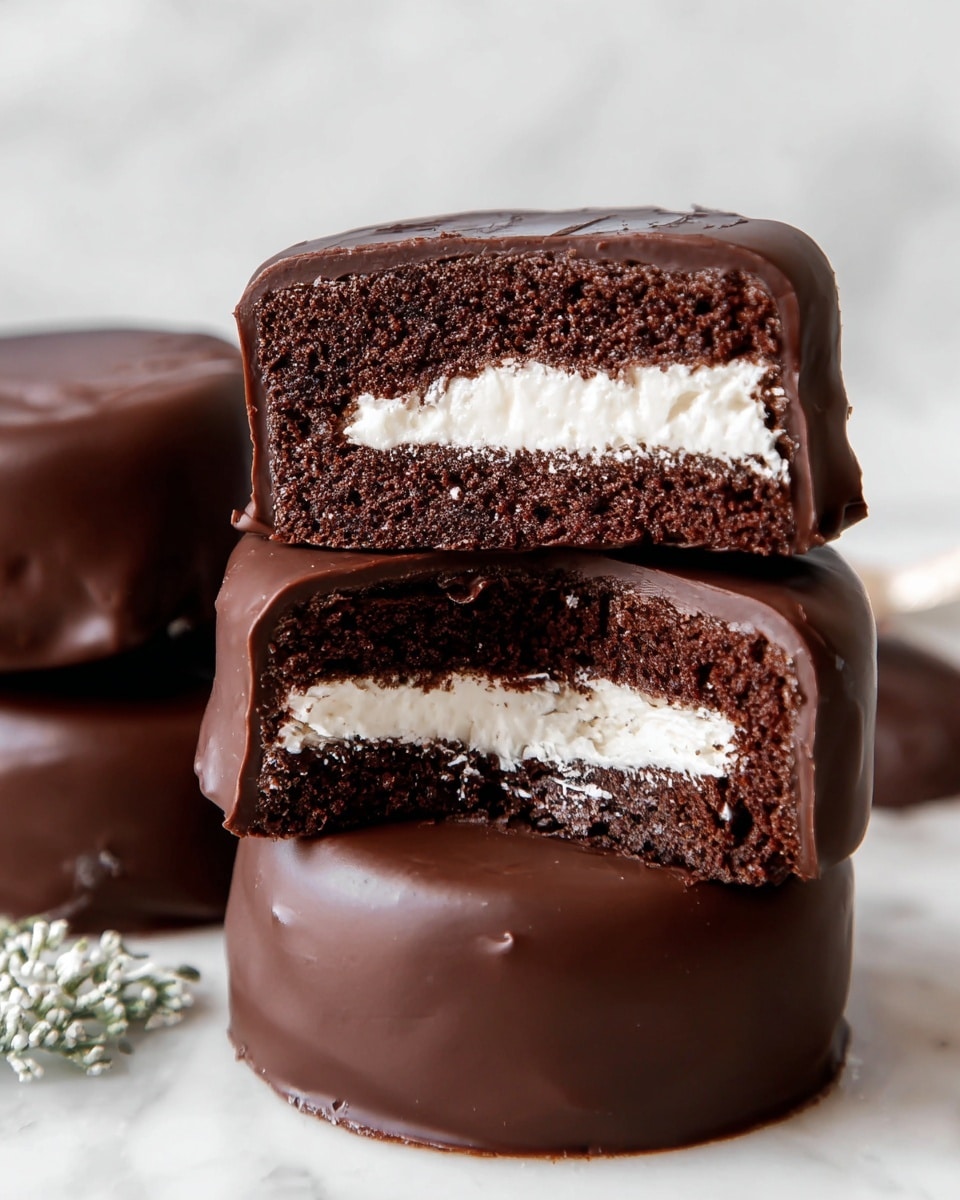
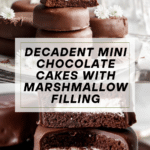
These mini chocolate cakes are a delightful treat featuring a gooey marshmallow filling and a rich chocolate coating. Perfect for gatherings or an indulgent snack, they combine moist cake with fluffy sweetness and a shiny, smooth chocolate finish.
Ingredients
- ¾ cup Dutch process cocoa powder (sifted)
- 1 cup boiling water
- 1¾ cups all purpose flour
- 1½ cups granulated sugar
- 2½ teaspoons baking powder
- ¾ teaspoon salt
- 2 large eggs (room temperature)
- ¾ cup whole milk
- ½ cup vegetable oil
- 1¾ teaspoons vanilla extract
- 2 large egg whites
- ⅔ cup granulated sugar
- 8 teaspoons water
- 4 cups melted or tempered chocolate
Instructions
- Step 1: Preheat the oven to 350℉ and spray your mini cake molds with baking spray. Set aside.
- Step 2: In a small bowl, whisk together the sifted cocoa powder and boiling water until smooth. Set this chocolate mixture aside.
- Step 3: In a large bowl, whisk together the flour, sugar, baking powder, and salt until well combined.
- Step 4: Add the eggs, milk, vegetable oil, and vanilla extract to the dry ingredients. Whisk until smooth and well incorporated.
- Step 5: Stir the cocoa and water mixture into the batter until evenly distributed.
- Step 6: Spoon the batter into the prepared molds, filling each about two-thirds full.
- Step 7: Bake for 18-20 minutes or until a toothpick inserted into the center comes out clean. Remove from oven and let cool.
- Step 8: To make the marshmallow filling, beat the egg whites in a clean bowl until stiff peaks form.
- Step 9: In a small saucepan, combine the granulated sugar and water. Cook over medium-low heat, stirring until the sugar dissolves.
- Step 10: Stop stirring and use a pastry brush dipped in water to brush down the sides of the saucepan to prevent crystallization. Continue cooking without stirring until the mixture reaches 246℉-250℉.
- Step 11: With the mixer running, slowly pour the hot sugar syrup into the whipped egg whites.
- Step 12: Continue beating the mixture until it cools to room temperature and forms a glossy, stable marshmallow filling.
- Step 13: Level the cooled cakes using a knife. Core each cake using a cupcake corer or spoon to create a hole for the filling.
- Step 14: Transfer the marshmallow filling to a piping bag and pipe it into each cored cake.
- Step 15: Place the cake “lid” cut from the cored portion back on top to enclose the filling.
- Step 16: Dip the bottom of each mini cake into the melted chocolate, then place them on a parchment-lined sheet pan to set.
- Step 17: Once set, place the cakes on a wire rack and spoon melted chocolate over the tops to evenly coat.
- Step 18: Allow the chocolate coating to fully set before serving.
Tips & Variations
- For a richer chocolate flavor, use dark chocolate for the coating or add a pinch of espresso powder to the batter.
- Ensure your eggs are at room temperature for better volume when whipping the egg whites.
- Use a candy thermometer to accurately reach the correct sugar syrup temperature for a stable marshmallow filling.
- Try adding a splash of flavored liqueur to the marshmallow filling for an adult twist.
Storage
Store the mini chocolate cakes in an airtight container at room temperature for up to 2 days. For longer storage, keep them refrigerated for up to 5 days; bring to room temperature before serving for best texture. The chocolate coating may become firm in the fridge but softens nicely once warmed slightly.
How to Serve
Serve this delicious recipe with your favorite sides.
FAQs
Can I make these cakes ahead of time?
Yes, you can bake and fill the cakes a day in advance. Store them properly as noted and add the final chocolate coating just before serving for the freshest look.
What can I use if I don’t have a cupcake corer?
If you don’t have a cupcake corer, a small spoon or melon baller works well to carefully hollow out the center of the cakes for the filling.
Print
Mini Chocolate Cakes with Marshmallow Filling and Chocolate Coating Recipe
- Total Time: 45 minutes
- Yield: 12 mini cakes 1x
Description
These Mini Chocolate Cakes with Marshmallow Filling and Chocolate Coating are a decadent treat combining rich cocoa-infused cakes with fluffy marshmallow filling, all enveloped in a smooth chocolate coating. Perfect for parties or a special dessert, they feature a moist texture from Dutch cocoa and whole milk, contrasted by a light, airy marshmallow center and a glossy chocolate exterior.
Ingredients
Cake Ingredients
- ¾ cup Dutch process cocoa powder (sifted)
- 1 cup boiling water
- 1¾ cups all purpose flour
- 1½ cups granulated sugar
- 2½ teaspoons baking powder
- ¾ teaspoon salt
- 2 large eggs (room temperature)
- ¾ cup whole milk
- ½ cup vegetable oil
- 1¾ teaspoons vanilla extract
Marshmallow Filling Ingredients
- 2 large egg whites
- ⅔ cup granulated sugar
- 8 teaspoons water
Chocolate Coating
- 4 cups melted or tempered chocolate
Instructions
- Preheat Oven: Heat the oven to 350℉ and prepare baking pans by spraying them with baking spray. Set aside.
- Prepare Cocoa Mixture: In a small bowl, whisk together the Dutch process cocoa powder and boiling water until smooth. Set aside to cool slightly.
- Mix Dry Ingredients: In a large bowl, whisk together the all-purpose flour, granulated sugar, baking powder, and salt until well combined.
- Add Wet Ingredients: To the dry ingredients, add the eggs, whole milk, vegetable oil, and vanilla extract. Whisk until the batter is smooth and uniform.
- Incorporate Cocoa: Stir the previously prepared cocoa mixture into the batter, ensuring it is fully blended for a rich chocolate flavor.
- Fill Molds and Bake: Spoon the batter into prepared molds, filling each about two-thirds full. Bake in the preheated oven for 18-20 minutes or until a tester inserted into the cakes comes out clean.
- Beat Egg Whites: While the cakes bake, beat the egg whites in a clean mixing bowl until stiff peaks form to prepare for the marshmallow filling.
- Cook Sugar Syrup: In a small saucepan, combine the granulated sugar and water. Cook over medium-low heat, stirring until the sugar dissolves completely.
- Brush Pot Sides: Stop stirring and brush down the sides of the saucepan with a pastry brush dipped in water to prevent crystallization.
- Heat Syrup to Soft Ball Stage: Continue cooking the sugar syrup without stirring until it reaches 246℉-250℉ (soft ball stage) on a candy thermometer.
- Combine Syrup and Egg Whites: With the mixer running on medium speed, slowly pour the hot sugar syrup into the stiff egg whites in a thin stream.
- Beat Marshmallow Filling: Continue beating the mixture until it cools and becomes glossy and fluffy, forming the marshmallow filling.
- Prepare Cakes for Filling: Once cakes are cooled, level their tops and core out the center using a cupcake corer or spoon to create space for the filling.
- Fill Cakes: Transfer the marshmallow filling into a piping bag and pipe it into the hollowed centers of each cake. Replace the cut-out cake lids on top to seal.
- Dip Base in Chocolate: Dip the bottom of each cake into the melted or tempered chocolate coating, then place them on a parchment-lined sheet pan to set.
- Coat Cakes with Chocolate: Place cakes on a wire cooling rack and spoon the melted chocolate over the tops and sides, ensuring even coverage. Allow the chocolate coating to set completely before serving.
Notes
- Using Dutch process cocoa powder gives a deeper, smoother chocolate flavor compared to natural cocoa.
- Be sure to use room temperature eggs to help the batter come together smoothly.
- Tempering the chocolate for coating will result in a shiny finish and crisp snap once set.
- The marshmallow filling should be used immediately after preparation to prevent it from deflating.
- Use a candy thermometer for accuracy when cooking sugar syrup to the correct temperature.
- Ensure cakes are fully cooled before coring and filling to prevent melting the marshmallow.
- Prep Time: 25 minutes
- Cook Time: 20 minutes
- Category: Dessert
- Method: Baking
- Cuisine: American
Keywords: mini chocolate cakes, marshmallow filling, chocolate coating, dessert, baked chocolate cake, homemade mini cakes