
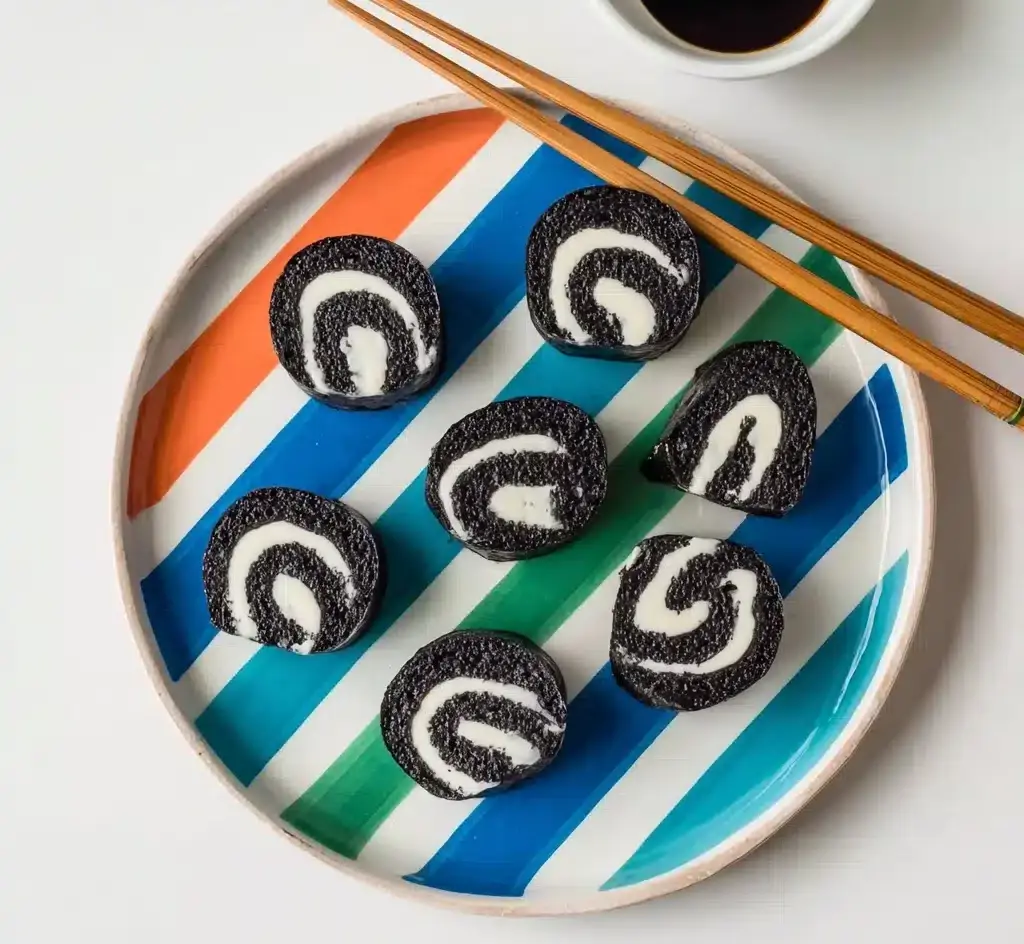
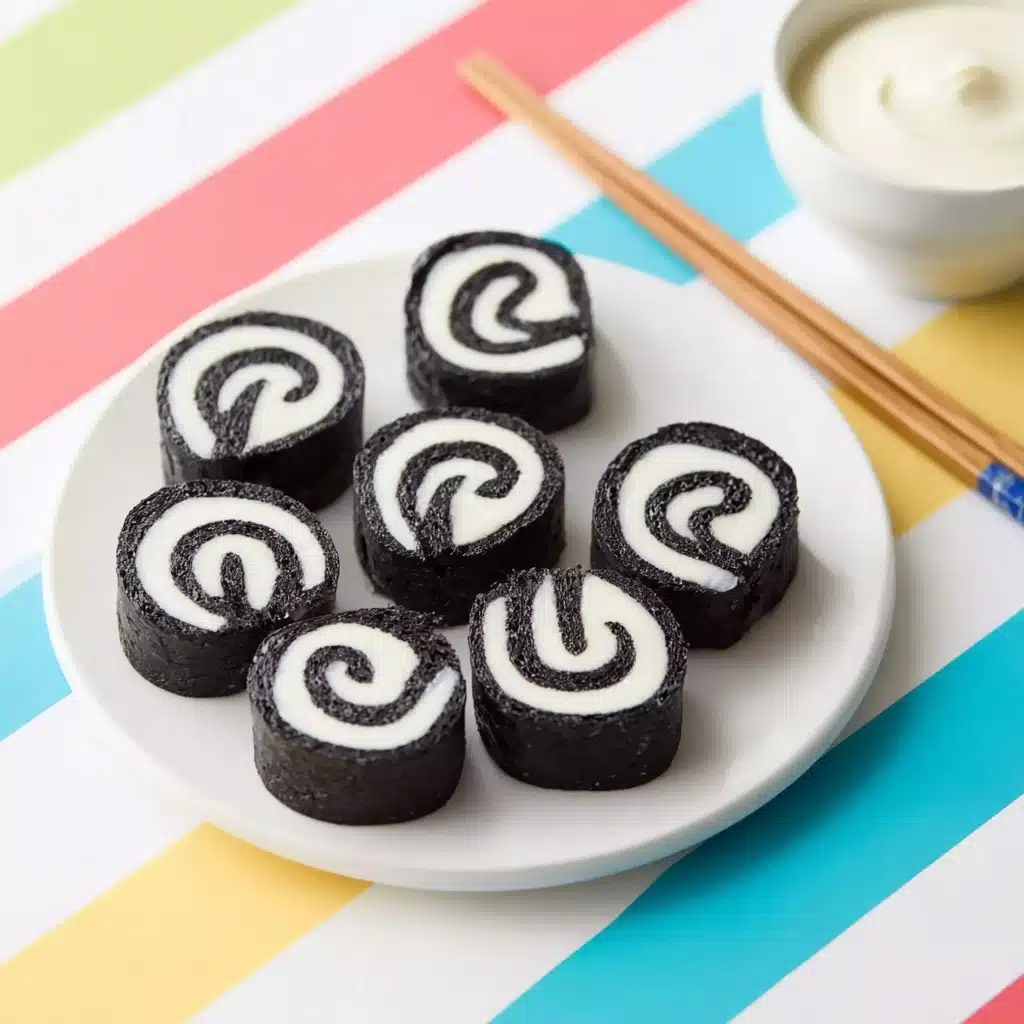
Oreo Sushi Rolls (Fun No-Bake Treat!) Recipe
If you’re craving a dessert that’s both playful and delicious, you have to try these irresistible Oreo Sushi Rolls (Fun No-Bake Treat!). They bring together the classic crunch and creaminess of Oreos with a creative sushi-inspired presentation that’s guaranteed to impress. Simple ingredients transform into bite-sized delights that feel festive and fun—perfect whether you’re entertaining guests or just indulging in a sweet treat at home.
Ingredients You’ll Need
Don’t be fooled by how simple the ingredient list is—each item plays a crucial role in making these Oreo Sushi Rolls both tasty and visually stunning. From the crisp Oreo base to the smooth filling, the combinations are endless and always satisfying.
- Oreo cookies: These provide the crunchy, chocolaty foundation that makes this dessert special.
- Milk or melted butter: A small amount binds the crushed Oreos into a pliable dough for easy rolling.
- Oreo cream, cream cheese, Nutella, or peanut butter: Choose your favorite filling for creamy, rich flavor that contrasts perfectly with the crunchy exterior.
- Strawberries or banana: Thin slices add a fruity freshness that balances out the sweetness.
- Rainbow sprinkles or mini chocolate chips: These give a fun pop of color and a little extra texture to brighten up the finished rolls.
How to Make Oreo Sushi Rolls (Fun No-Bake Treat!)
Step 1: Separate and Save
Begin by twisting apart each Oreo cookie carefully, keeping the chocolate wafers and scraping off the cream. If you want to use that classic Oreo cream as part of your filling, set it aside now. This step sets the stage for perfectly textured rolls.
Step 2: Crush the Oreos
Place the chocolate wafers in a food processor for the quickest results or pop them into a zip-top bag and crush with a rolling pin until you have fine crumbs. The finer the crumbs, the smoother your dough will be.
Step 3: Form the Dough
Mix the crushed cookies with 1 to 2 tablespoons of milk or melted butter. The goal is a dough that can be rolled out easily but is not sticky. This binds the crumbs into a moldable base, ready to hold fillings.
Step 4: Roll into a Rectangle
Place your dough between two sheets of parchment paper to prevent sticking and roll it out thinly and evenly. This thin rectangular sheet will make it easy to spread your filling and roll properly.
Step 5: Spread the Filling
Choose your filling—be it reserved Oreo cream, Nutella, cream cheese, or peanut butter—and spread it evenly across the entire surface. This layer adds moisture and richness, ensuring every bite is creamy and delicious.
Step 6: Roll It Up Tightly
Using the parchment paper to help, start rolling your dough like sushi. A tight roll means tidy slices and a fantastic sushi look that’s so satisfying to serve.
Step 7: Chill Until Firm
Pop the roll into the refrigerator for 30 to 60 minutes. Chilling firms up the roll, making slicing a breeze and preserving the shape.
Step 8: Slice into Sushi-Sized Pieces
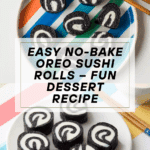
With a sharp serrated knife, cut the chilled roll into approximately 1-inch slices. For the cleanest cuts, wipe the blade between slices. And just like that, your Oreo Sushi Rolls (Fun No-Bake Treat!) are ready to wow!
How to Serve Oreo Sushi Rolls (Fun No-Bake Treat!)
Garnishes
Enhance your Oreo Sushi Rolls with colorful garnishes like additional sprinkles, a drizzle of chocolate or caramel, or even a dusting of powdered sugar. These toppings add visual appeal and a hint of extra flavor that make the rolls irresistible.
Side Dishes
Serve these fun no-bake treats alongside fresh fruit slices, a scoop of vanilla ice cream, or a small cup of fruit compote. These sides provide a refreshing contrast that balances the richness of the Oreo rolls beautifully.
Creative Ways to Present
Arrange your Oreo Sushi Rolls on a sushi platter with wasabi and ginger candies for themed parties, or stack them in a tiered dessert display for a stunning centerpiece. Even adding toothpicks or colorful cocktail sticks can make them easier and more enjoyable to eat while looking adorable.
Make Ahead and Storage
Storing Leftovers
Keep any leftover Oreo Sushi Rolls refrigerated in an airtight container to maintain their freshness. They’ll stay perfect for up to 3 days, making them a convenient treat to enjoy later or share with friends.
Freezing
For longer storage, wrap the rolls tightly in plastic wrap and place them in a freezer-safe bag. Frozen Oreo Sushi Rolls can last for about a month. When ready, thaw them overnight in the fridge to maintain texture and flavor.
Reheating
Since these are no-bake treats, reheating isn’t necessary. Serve them chilled or at room temperature for the best experience. If you want to soften the cream filling slightly, let the rolls sit out for 10 minutes before serving.
FAQs
Can I use other cookies instead of Oreos?
Absolutely! While Oreos provide the classic flavor and look, you can experiment with chocolate wafers, graham crackers, or even gluten-free alternatives for different tastes and dietary needs.
What if I don’t have a food processor?
No worries! Just place the cookies in a sealed bag and crush them with a rolling pin or a heavy pan until finely ground. It’s manual but works just as well.
Can I make these vegan?
Yes, swap the Oreos for a vegan cookie brand, and use plant-based milk or butter alternatives. For the filling, almond butter or a vegan chocolate spread works beautifully.
How long do Oreo Sushi Rolls last once made?
Stored properly in the fridge, they stay fresh and delicious for up to 3 days. Beyond that, the texture may change, but freezing can help preserve them longer.
Can I add other fillings besides Oreo cream or Nutella?
Definitely! Peanut butter, cream cheese frosting, or even fruit preserves are fantastic options that add variety and personal flair.
Final Thoughts
There’s something incredibly joyful about making and sharing Oreo Sushi Rolls (Fun No-Bake Treat!). They’re a creative twist on a beloved cookie that’s sure to bring smiles and compliments at any gathering. Dive in and experiment with your favorite flavors—you’ll find how easy it is to create a dessert that’s as fun to make as it is to eat!
Print
Oreo Sushi Rolls (Fun No-Bake Treat!) Recipe
- Total Time: 1 hour (including chilling time)
- Yield: Makes approximately 15–20 slices 1x
- Diet: Vegetarian
Description
Oreo Sushi Rolls are a fun and creative no-bake dessert that mimics the look of sushi using Oreo cookies, creamy fillings, and fresh fruit. This treat is easy to make with simple ingredients, perfect for parties, kids, or anyone with a sweet tooth looking for a playful twist on a classic cookie.
Ingredients
Cookie Base
- 20 Oreo cookies (separated, filling reserved if using)
- 2 tablespoons milk or melted butter (to bind the cookie crumbs into dough)
Fillings
- 2–3 tablespoons Oreo cream, cream cheese, Nutella, or peanut butter (for the filling)
Fruity Variations
- 1–2 strawberries or ½ banana, sliced thinly (optional for fruity variation)
Toppings
- 1 tablespoon rainbow sprinkles or mini chocolate chips
Instructions
- Separate the Oreos: Twist apart the Oreo cookies and carefully scrape out the cream filling. Set the filling aside if you plan to reuse it in the rolls or as a spreading component.
- Crush the cookies: Place the separated cookie halves into a food processor or a sturdy zip-top bag and crush them into fine crumbs to form the base dough.
- Form the dough: Combine the crushed cookie crumbs with 2 tablespoons of milk or melted butter. Mix thoroughly until a pliable but not sticky dough forms, which can be easily rolled out.
- Roll it out: Place the cookie dough between two sheets of parchment paper and use a rolling pin to roll it out into a thin, even rectangle—this will be the ‘seaweed’ wrap of your sushi.
- Spread the filling: Evenly spread 2–3 tablespoons of your chosen filling—Oreo cream, cream cheese, Nutella, or peanut butter—over the rolled-out dough, ensuring a uniform layer for consistency in every bite.
- Add fruit (optional): For a fruity twist, place thin slices of strawberry or banana evenly over the filling before rolling.
- Roll it up: Using the parchment paper as a guide, carefully roll the dough into a tight log, similar to rolling sushi, without squeezing out the filling.
- Chill: Place the rolled log in the refrigerator for 30 to 60 minutes to allow it to firm up, which will make slicing easier and keep the shape intact.
- Slice into sushi pieces: Using a sharp, serrated knife, cut the chilled roll into 1-inch thick slices. Clean the knife between cuts for clean, neat edges.
- Decorate and serve: Sprinkle rainbow sprinkles or mini chocolate chips on the edges or top of each sushi piece to mimic the look of sushi roe and add extra sweetness.
Notes
- Use fresh fruit slices for added flavor and a healthier twist.
- Ensure the dough is not too sticky; adjust milk or butter quantity accordingly.
- Keep the roll chilled until just before serving to maintain shape.
- Store leftovers in an airtight container in the refrigerator for up to 2 days.
- Use a serrated knife for clean cuts without crushing the rolls.
- Prep Time: 20 minutes
- Cook Time: 0 minutes
- Category: Dessert, Snack
- Method: No-Bake, Assembly
- Cuisine: American, Fusion
Nutrition
- Serving Size: 2 slices (about 40g)
- Calories: 180 kcal
- Sugar: 16g
- Sodium: 110mg
- Fat: 9g
- Saturated Fat: 4g
- Unsaturated Fat: 3g
- Trans Fat: 0g
- Carbohydrates: 22g
- Fiber: 1g
- Protein: 2g
- Cholesterol: 5mg
Keywords: Oreo sushi rolls, no bake dessert, Oreo cookie rolls, kid-friendly treats, creative desserts


